No-Bake Strawberries Cream Delight Recipe
Introduction
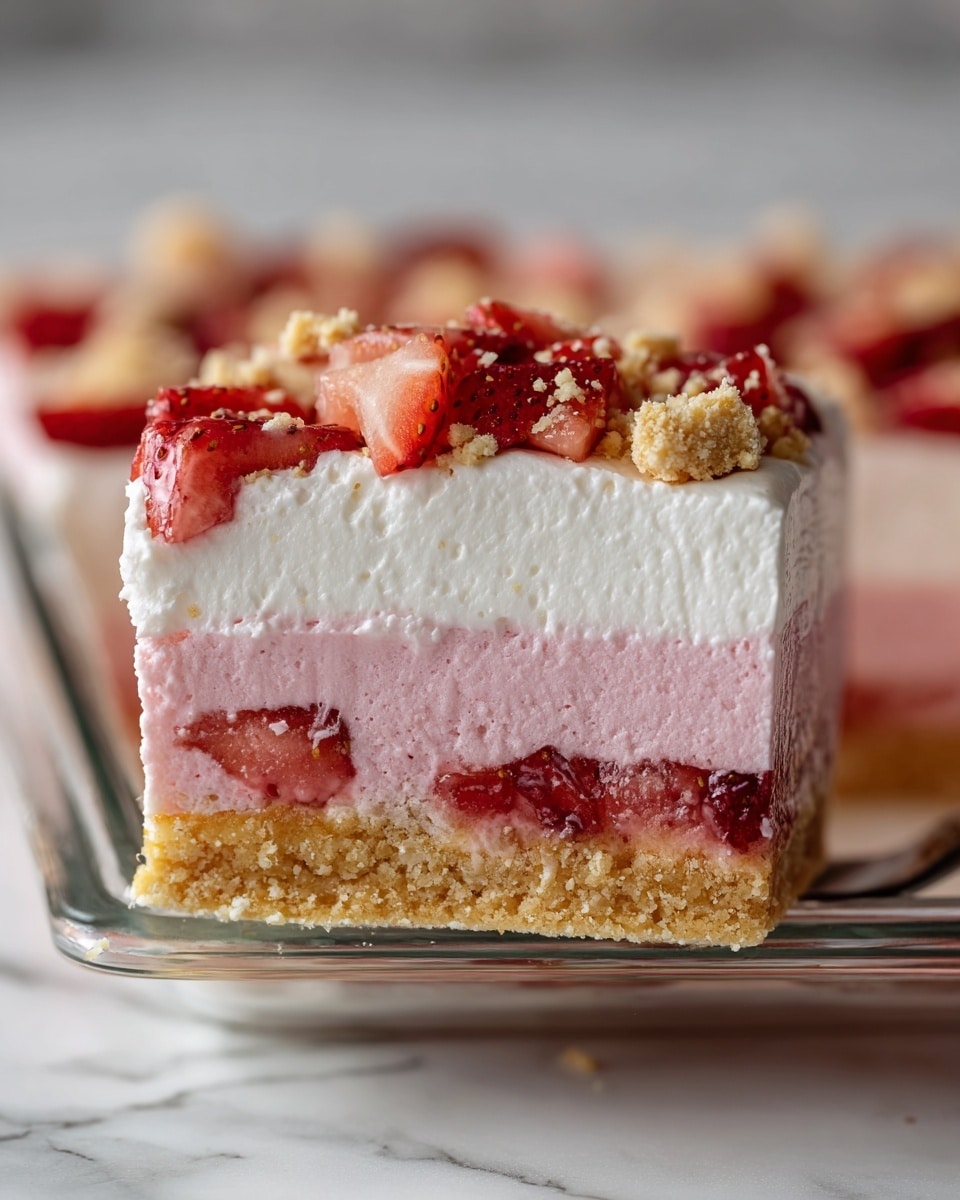
This No-Bake Strawberries Cream Delight is a luscious and creamy dessert that combines the crunch of golden Oreos with fresh strawberries and a smooth cream cheese filling. It’s simple to make and perfect for warm days when you want a cool, refreshing treat without turning on the oven.

Ingredients
- 20 finely crushed golden Oreos (about 8 oz.), plus 3 finely chopped
- 1/4 tsp. kosher salt
- 4 tbsp. unsalted butter, melted, cooled
- 12 oz. cream cheese, softened
- 3/4 cup (85 g) confectioners’ sugar, divided plus 1 Tbsp. extra
- 1 1/2 tsp. vanilla extract, divided
- 2 1/4 cups heavy cream, divided
- 5 tsp. strawberry gelatin powder (such as strawberry Jell-O)
- 2/3 cup fresh strawberries, hulled and finely chopped
Instructions
- Step 1: In a large bowl, whisk together the crushed cookies and kosher salt. Add the melted butter and stir until well combined. Press this mixture evenly into the bottom of an 8″ x 8″ glass baking dish. Refrigerate while you prepare the filling.
- Step 2: In another large bowl, beat the softened cream cheese, 3/4 cup confectioners’ sugar, and 1 teaspoon vanilla extract on medium-high speed until smooth and creamy, about 1 to 2 minutes. Gradually add 1 1/2 cups heavy cream and continue beating until the mixture is light and fluffy, 2 to 3 minutes more.
- Step 3: Spread half of this cream cheese mixture evenly over the cookie crust, smoothing the top with a spatula.
- Step 4: Add the strawberry gelatin powder to the remaining cream cheese mixture and beat until fully incorporated and uniform in color, about 1 minute. Spread this strawberry layer evenly over the cream cheese layer. Refrigerate for at least 2 hours or up to 1 day to set.
- Step 5: When ready to serve, whip the remaining 3/4 cup heavy cream with 1 tablespoon confectioners’ sugar and 1/2 teaspoon vanilla extract on medium-high speed until stiff peaks form.
- Step 6: Spread the whipped cream over the set strawberry layer. Garnish the top with the chopped fresh strawberries and the 3 finely chopped golden Oreos. Serve chilled.
Tips & Variations
- For a tart twist, substitute some of the fresh strawberries with raspberries or blueberries.
- You can use any flavored gelatin powder if you want to change the flavor profile, such as cherry or peach.
- Press the crust firmly to avoid it crumbling when scooping the dessert.
- For easier cleanup, line the baking dish with parchment paper before pressing in the crust.
Storage
Store this dessert covered in the refrigerator for up to 3 days. Keep it chilled until ready to serve. When reheating is not recommended, as this is best enjoyed cold and fresh. If it loses some firmness, simply give it a gentle stir before serving.
How to Serve
Serve this delicious recipe with your favorite sides.
FAQs
Can I use regular Oreos instead of golden Oreos?
Yes, you can use regular Oreos if you prefer. The crust will have a richer chocolate flavor which pairs well with strawberries and cream.
Can this dessert be made ahead of time?
Absolutely. It can be assembled and refrigerated for up to 1 day before serving, making it a great option for entertaining or meal prep.
PrintNo-Bake Strawberries Cream Delight Recipe

This No-Bake Strawberries Cream Delight is a luscious and creamy layered dessert featuring a crunchy Oreo crust, smooth cream cheese filling, a vibrant strawberry gelatin layer, and a fluffy whipped cream topping garnished with fresh strawberries and extra cookies. Perfect for a refreshing and easy-to-make treat that requires no baking and can be prepared ahead of time.
- Prep Time: 20 minutes
- Cook Time: 0 minutes
- Total Time: 2 hours 20 minutes (including chilling time)
- Yield: 8 servings 1x
- Category: Dessert
- Method: No-Cook
- Cuisine: American
Ingredients
Crust
- 20 finely crushed golden Oreos (about 8 oz.), plus 3 finely chopped
- 1/4 tsp. kosher salt
- 4 tbsp. unsalted butter, melted and cooled
Cream Cheese Filling
- 12 oz. cream cheese, softened
- 3/4 cup (85 g) confectioners’ sugar, divided
- 1 1/2 tsp. vanilla extract, divided
- 2 1/4 cups heavy cream, divided
Strawberry Gelatin Layer
- 5 tsp. strawberry gelatin powder (such as strawberry Jell-O)
- 2/3 cup fresh strawberries, hulled and finely chopped
Topping
- Remaining 3/4 cup heavy cream
- 1 tbsp. confectioners’ sugar
- 1/2 tsp. vanilla extract
- Fresh strawberries and chopped cookies for garnish
Instructions
- Prepare the crust: In a large bowl, whisk together the finely crushed golden Oreos and kosher salt. Pour in the melted and cooled unsalted butter and stir until the mixture is evenly combined. Press this mixture firmly into the bottom of an 8″ x 8″ glass baking dish. Refrigerate until ready to use.
- Make the cream cheese filling: In a separate large bowl, use a handheld mixer on medium-high speed to beat the softened cream cheese, 3/4 cup confectioners’ sugar, and 1 teaspoon vanilla extract until smooth and creamy, about 1 to 2 minutes. Gradually add 1 1/2 cups of heavy cream and continue beating until the mixture is light and fluffy, an additional 2 to 3 minutes.
- Assemble first cream layer: Spread half of the cream cheese mixture (approximately 380 grams) evenly over the prepared Oreo crust. Smooth the top using a mini offset spatula or the back of a flat rubber spatula for an even layer.
- Prepare the strawberry gelatin layer: To the remaining cream cheese mixture, add the strawberry gelatin powder and beat until fully combined and the color is uniform throughout, about 1 minute. Spread this strawberry gelatin mixture evenly over the cream cheese layer. Smooth the top carefully. Refrigerate the layered dessert until the gelatin layer is cold and set, which takes at least 2 hours and up to 1 day.
- Make the whipped cream topping: When ready to serve, pour the remaining 3/4 cup of heavy cream into a medium bowl along with 1 tablespoon confectioners’ sugar and 1/2 teaspoon vanilla extract. Using a handheld mixer on medium-high speed, beat until stiff peaks form.
- Finish the dessert: Spread the freshly whipped cream evenly over the set strawberry gelatin layer. Decorate the top by sprinkling with fresh chopped strawberries and the reserved finely chopped cookies for added texture and visual appeal.
Notes
- You can use a food processor to blitz the crushed cookies and mix them with the butter quickly.
- Make sure the cream cheese is softened to room temperature for smooth blending.
- Chill the assembled dessert thoroughly to allow the strawberry gelatin layer to set properly.
- For extra flavor, use golden Oreos for a subtle vanilla twist or regular Oreos if preferred.
- This dessert can be prepared a day in advance and kept refrigerated, making it ideal for entertaining.
Keywords: no-bake, strawberries, cream cheese dessert, easy dessert, layered dessert, strawberry gelatin, Oreo crust, summer dessert
