Mini Pop-Tart Cookies Recipe
Introduction
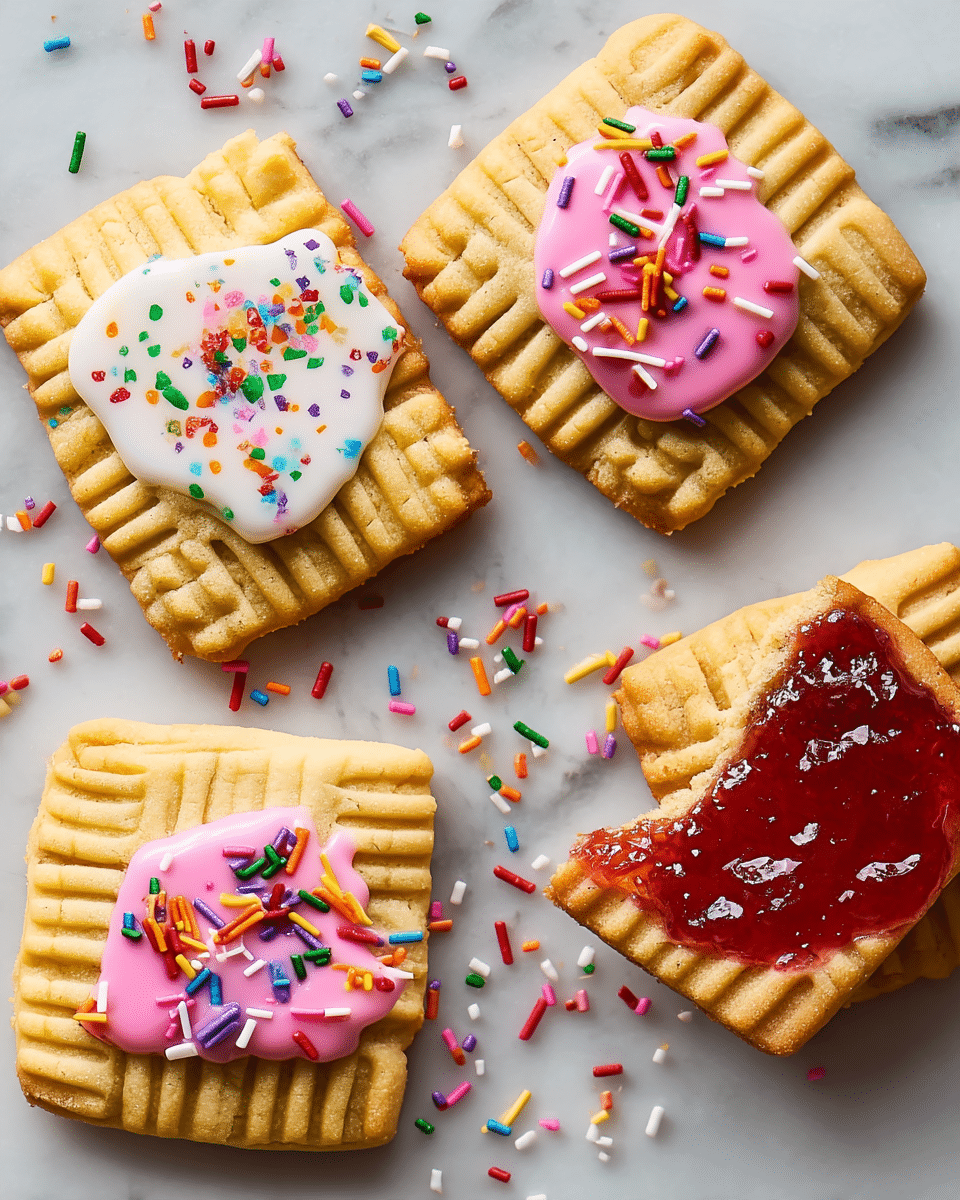
These Mini Pop-Tart Cookies are a delightful twist on the classic breakfast treat, transformed into fun, bite-sized cookies. Filled with sweet strawberry jam and topped with a colorful glaze and sprinkles, they’re perfect for snacking or sharing at parties.
Ingredients
- 1 cup (2 sticks) unsalted butter, softened
- 1 cup (200 g) granulated sugar
- 1 large egg
- 1 tbsp. whole milk
- 1 tsp. baking powder
- 1 tsp. pure vanilla extract
- 1/2 tsp. kosher salt
- 3 cups (360 g) all-purpose flour, plus more for dusting
- 6 tbsp. strawberry jam, cold
- 2 cups (226 g) confectioners’ sugar
- 2 tbsp. light corn syrup
- 2 tbsp. (or more) whole milk
- 1/8 tsp. kosher salt or fine sea salt
- Pink gel food coloring
- Rainbow sanding sugar and long rainbow sprinkles, for decorating
Instructions
- Step 1: In a large bowl, use a handheld mixer on medium-high speed to beat the softened butter and granulated sugar until light and fluffy, about 2 minutes. Add the egg, milk, baking powder, vanilla, and salt, and beat until smooth and combined.
- Step 2: Add the flour and beat on low speed just until a soft dough forms, about 15 seconds. Avoid overmixing.
- Step 3: Turn the dough onto a clean surface and divide it in half. Shape each half into a disk, tightly wrap in plastic wrap, and refrigerate until firm, at least 2 hours or up to 3 days.
- Step 4: Working with one disk at a time, place dough between two sheets of parchment paper. Roll to a 14″ x 10″ rectangle about 1/8″ thick. Peel off the top sheet of parchment and lightly flour the surface of the dough.
- Step 5: Using a pizza cutter or sharp knife, cut the dough into 2″ squares (about 35 total). Transfer the parchment with dough onto a large baking sheet and refrigerate until firm, at least 2 hours or up to 12 hours. Repeat with remaining dough.
- Step 6: Preheat oven to 350°F and arrange a rack in the center. Have a small bowl of room temperature water nearby. Working one sheet at a time, lightly dab the surface of each square with water using your fingertip. Spoon 1/2 teaspoon of jam into the center of each square.
- Step 7: Remove the remaining squares from the refrigerator. Place one square over each jam-filled square. Gently press around the edges, avoiding the center, then crimp edges with a fork to seal.
- Step 8: Bake cookies until tops and edges are set, about 13 to 15 minutes. Let cool completely on the baking sheet.
- Step 9: To make the glaze, in a medium bowl, beat confectioners’ sugar, corn syrup, milk, vanilla, and salt on low speed until combined, about 30 seconds. Increase speed to high and beat until smooth and glossy, about 1 minute more. Add more milk 1 teaspoon at a time if needed to reach a thick but spreadable consistency.
- Step 10: Divide the glaze between two bowls. Add 1 drop of pink gel food coloring to one bowl and stir until evenly colored. Add more food coloring to reach desired shade.
- Step 11: Spoon about 1 tablespoon of pink glaze onto half the cookies and spread into an even layer. Repeat with the plain glaze on the remaining cookies. Decorate with rainbow sanding sugar and sprinkles as desired.
Tips & Variations
- Chilling the dough and squares thoroughly helps maintain their shape and prevents the jam from leaking during baking.
- Try different jam flavors like blueberry, raspberry, or apricot for a fun twist.
- For a dairy-free version, substitute butter with a dairy-free margarine and use a plant-based milk.
Storage
Store the cooled and glazed cookies in an airtight container at room temperature for up to 3 days. For longer storage, keep them refrigerated for up to 5 days. Before serving, let refrigerated cookies come to room temperature. The glaze is best enjoyed fresh but will firm up when chilled.
How to Serve

Serve this delicious recipe with your favorite sides.
FAQs
Can I freeze these cookies?
Yes, you can freeze the baked and glazed cookies. Place them in a single layer on a baking sheet to freeze first, then transfer to an airtight container or freezer bag. Freeze for up to 2 months. Thaw at room temperature before serving.
What if I don’t have corn syrup for the glaze?
You can substitute light corn syrup with honey or golden syrup in equal amounts. This will still give a glossy finish but may slightly alter the sweetness and flavor of the glaze.
PrintMini Pop-Tart Cookies Recipe

These Mini Pop-Tart Cookies are a delightful twist on the classic toaster treat, featuring a soft, buttery cookie dough filled with sweet strawberry jam and topped with a glossy, colorful glaze and festive sprinkles. Perfect as a fun dessert or snack, these cookies combine the nostalgic flavors of pop-tarts with the texture of a homemade cookie.
- Prep Time: 20 minutes
- Cook Time: 15 minutes
- Total Time: 3 hours 35 minutes
- Yield: Approximately 70 cookies 1x
- Category: Dessert
- Method: Baking
- Cuisine: American
Ingredients
Cookie Dough
- 1 cup (2 sticks) unsalted butter, softened
- 1 cup (200 g) granulated sugar
- 1 large egg
- 1 tbsp whole milk
- 1 tsp baking powder
- 1 tsp pure vanilla extract
- 1/2 tsp kosher salt
- 3 cups (360 g) all-purpose flour, plus more for dusting
- 6 tbsp strawberry jam, cold
Glaze
- 2 cups (226 g) confectioners’ sugar
- 2 tbsp light corn syrup
- 2 tbsp (or more) whole milk
- 1/8 tsp kosher salt or fine sea salt
- Pink gel food coloring
Decoration
- Rainbow sanding sugar
- Long rainbow sprinkles
Instructions
- Prepare Cookie Dough: In a large bowl, beat the softened butter and granulated sugar together using a handheld mixer on medium-high speed until the mixture is light and fluffy, about 2 minutes. Add the egg, whole milk, baking powder, vanilla extract, and kosher salt, then continue beating until smooth and fully combined. Gradually add the all-purpose flour and beat on low speed just until a soft dough forms, approximately 15 seconds, taking care not to overmix.
- Chill Dough: Turn out the dough onto a clean surface and split it into two equal portions. Shape each portion into a disk, wrap tightly in plastic wrap, and refrigerate until firm, for at least 2 hours or up to 3 days.
- Roll and Cut Dough: Working with one disk at a time, place the dough between two sheets of parchment paper. Roll it out to a 14” x 10” rectangle about 1/8 inch thick. Remove the top parchment sheet and lightly flour the surface of the dough. Use a pizza cutter or sharp knife to cut the dough into 2-inch squares, yielding about 35 squares per disk. Transfer the parchment with dough squares onto a large baking sheet and refrigerate until firm, at least 2 hours and up to 12 hours. Repeat this with the second disk.
- Preheat Oven and Prepare for Filling: Arrange a rack in the center of the oven and preheat it to 350°F (175°C). Keep a small bowl of room temperature water nearby for sealing the cookies.
- Fill Cookies: Working one baking sheet at a time, lightly dab the surface of half of the dough squares with water using your fingertip. Spoon about 1/2 teaspoon of cold strawberry jam into the center of each moistened square.
- Seal Cookies: Remove the remaining dough squares from the refrigerator and place one square over each jam-filled square. Gently press around the edges without pressing the center to avoid squeezing out jam. Use a fork to crimp and seal the edges securely.
- Bake Cookies: Bake the cookies in the preheated oven until the tops and edges are set, about 13 to 15 minutes. Once baked, allow them to cool completely on the baking sheets.
- Make the Glaze: In a medium bowl, blend the confectioners’ sugar, light corn syrup, whole milk, vanilla extract, and salt using a handheld mixer on low speed until combined, about 30 seconds. Increase the mixer speed to high and beat until the glaze is smooth and glossy, approximately 1 minute more. The glaze should be thick but spreadable; if it’s too thick, add additional milk one teaspoon at a time to reach consistency.
- Color the Glaze: Divide the glaze evenly between two bowls. To one bowl, add 1 drop of pink gel food coloring and stir to mix, adding more coloring as necessary until the desired shade is achieved.
- Glaze and Decorate: Spoon about 1 tablespoon of pink glaze onto half of the cooled cookies and spread it evenly. Use the plain white glaze for the remaining cookies. Decorate the glazed cookies with rainbow sanding sugar and long rainbow sprinkles as desired. Allow the glaze to set before serving.
Notes
- Chilling the dough before rolling and cutting helps maintain cookie shape and ensures a tender texture.
- Using cold strawberry jam prevents it from melting too quickly during baking.
- The glaze consistency can be adjusted with milk to make it easier to spread without being runny.
- Store cookies in an airtight container at room temperature for up to 3 days to maintain freshness.
- For a different filling, try raspberry or apricot jam.
Keywords: mini pop-tart cookies, strawberry jam cookies, glazed cookies, homemade pop-tarts, fun dessert, kids cookies