Chocolate Covered Snickers Stuffed Dates Recipe
Introduction
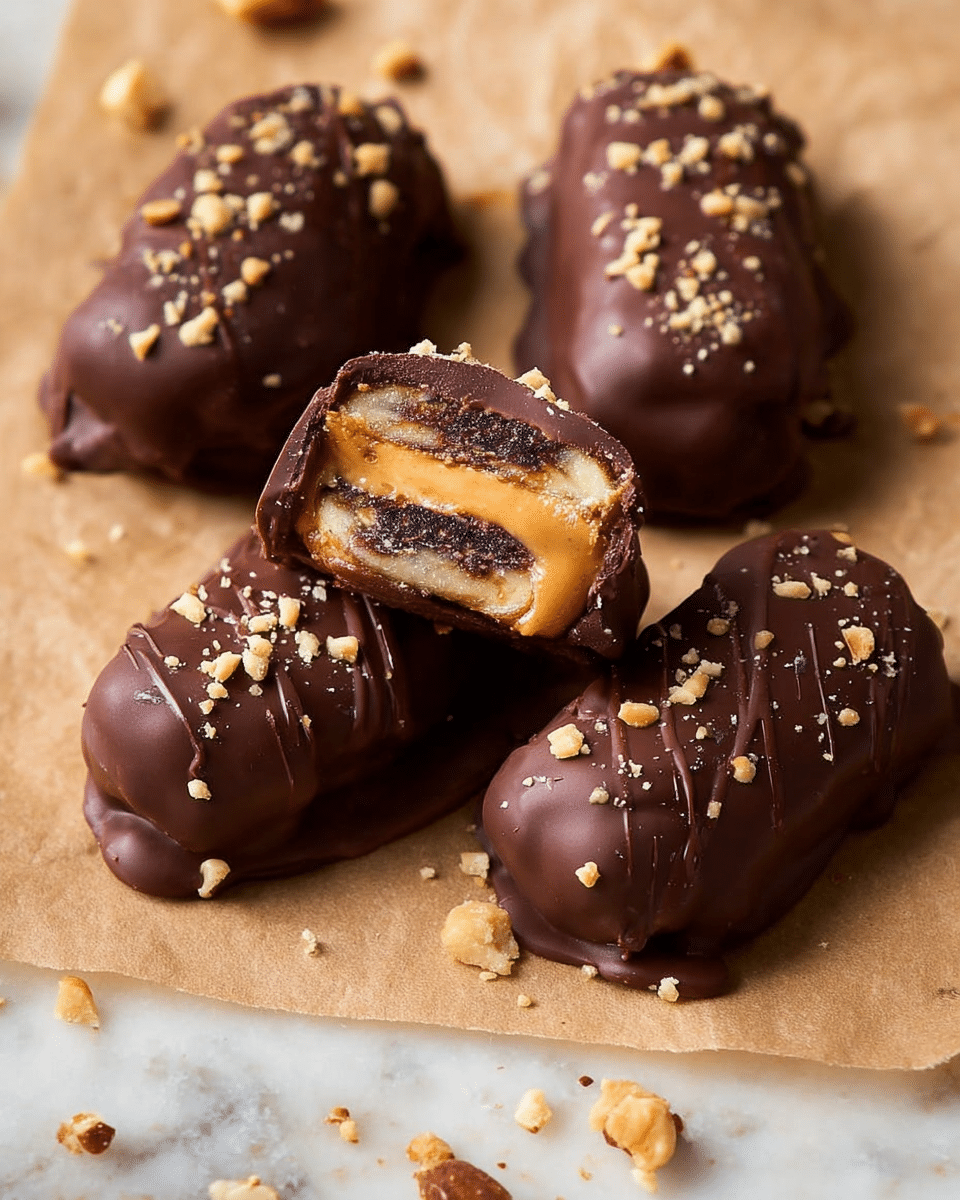
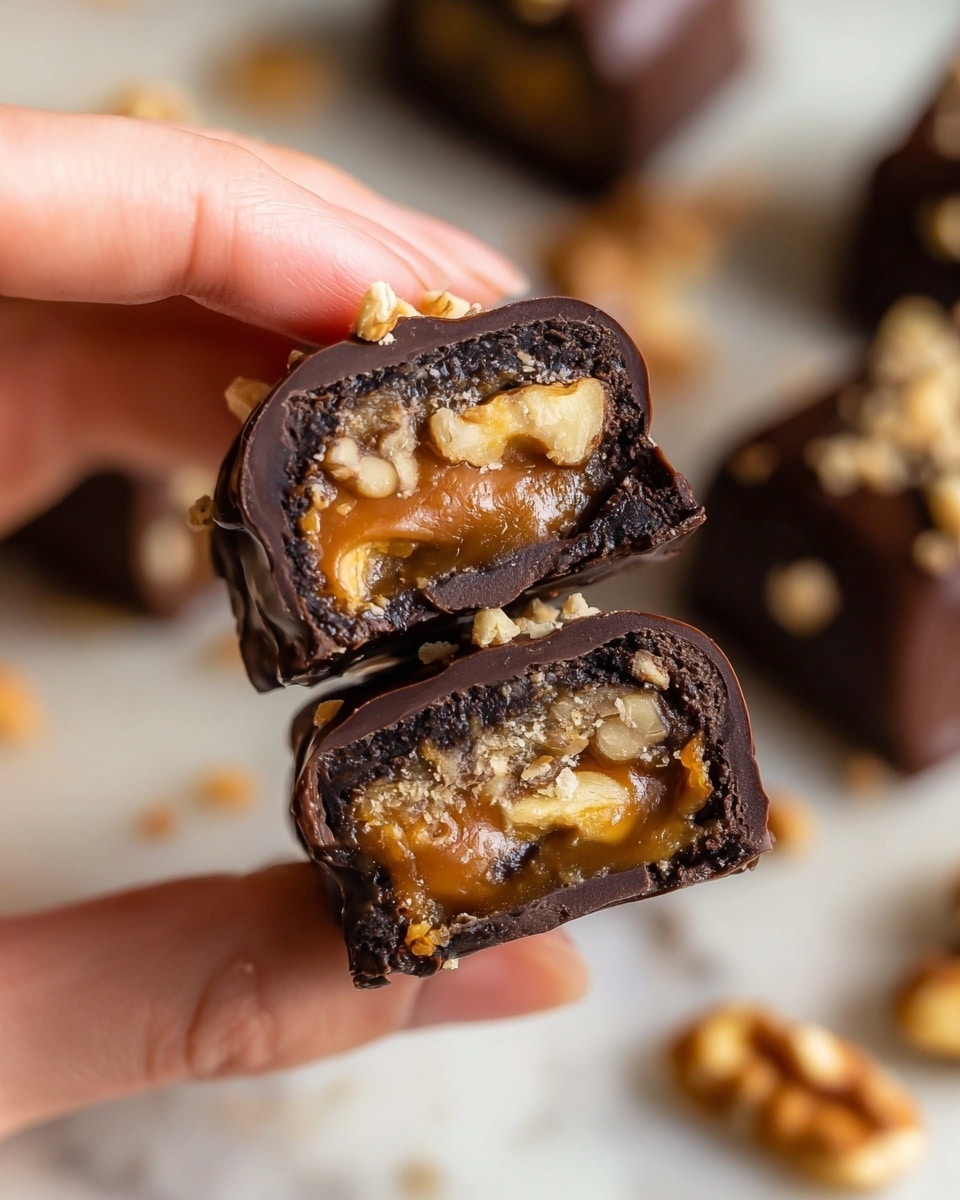
These Chocolate Covered Snickers Stuffed Dates are a delightful blend of sweet and salty flavors wrapped in a chewy date. Packed with peanut butter and crunchy peanuts, then dipped in rich dark chocolate, they make a perfect bite-sized treat for any occasion.
Ingredients
- 10 medjool dates
- 2 tablespoons peanut butter
- ¼ cup chopped or crushed peanuts
- ½ cup dairy-free dark chocolate chunks or chocolate chips
- 1 teaspoon coconut oil
Instructions
- Step 1: Cut a slit in each date and remove the pit carefully.
- Step 2: Fill each date with about ½ teaspoon of peanut butter and sprinkle some crushed peanuts inside. Set aside.
- Step 3: Place the dark chocolate chunks and coconut oil in a microwave-safe bowl. Melt them in the microwave in 15-second increments, stirring between each, until smooth and fully melted, about 1 to 2 minutes.
- Step 4: Using a toothpick, dip each stuffed date into the melted chocolate. Use a spoon to cover the date completely with chocolate. Place the coated dates on a parchment-lined platter.
- Step 5: Sprinkle the remaining crushed peanuts on top of each chocolate-covered date.
- Step 6: Chill the dates in the refrigerator until the chocolate sets, about 20 to 30 minutes.
Tips & Variations
- For extra texture, add a pinch of sea salt on top of the chocolate before it sets.
- Try using almond butter or cashew butter instead of peanut butter for a different flavor.
- Use dark chocolate with a higher cocoa percentage for a richer taste or milk chocolate for a sweeter treat.
Storage
Store leftover chocolate covered dates in an airtight container in the refrigerator for up to one week. Let them sit at room temperature for a few minutes before serving to soften the chocolate slightly.
How to Serve
Serve this delicious recipe with your favorite sides.
FAQs
Can I use other types of dates?
Medjool dates work best for stuffing because they are large and soft, but other soft, large dates can be used if Medjool are unavailable.
Is it necessary to use coconut oil in the chocolate?
Coconut oil helps the chocolate melt smoothly and harden with a nice shine, but you can omit it if preferred; the chocolate may be thicker and less glossy.
PrintChocolate Covered Snickers Stuffed Dates Recipe

These Chocolate Covered Snickers Stuffed Dates are a delicious and healthier twist on a classic candy bar. Medjool dates are filled with creamy peanut butter and crunchy peanuts, then coated in rich dairy-free dark chocolate. This easy no-bake treat combines sweet, salty, and nutty flavors and a variety of textures for a satisfying snack or dessert that’s gluten-free and vegan-friendly.
- Prep Time: 10 minutes
- Cook Time: 5 minutes
- Total Time: 15 minutes
- Yield: 10 stuffed dates 1x
- Category: Dessert
- Method: No-Cook
- Cuisine: American
- Diet: Gluten Free
Ingredients
Dates and Filling
- 10 medjool dates
- 2 Tablespoons peanut butter
- ¼ cup chopped or crushed peanuts
Chocolate Coating
- ½ cup dairy-free dark chocolate chunks or chocolate chips
- 1 teaspoon coconut oil
Instructions
- Remove Pit: Cut a slit in each medjool date and carefully remove the pit to make room for the filling.
- Fill Dates: Spoon approximately ½ teaspoon of peanut butter into each pitted date and sprinkle with some crushed peanuts for added crunch. Set aside these stuffed dates.
- Melt Chocolate: In a microwave-safe bowl, combine the dairy-free dark chocolate chunks with the coconut oil. Microwave in 15-second increments, stirring thoroughly between each session until smooth and fully melted, about 1 to 2 minutes total.
- Dip Dates: Using a toothpick to hold each date, dip it into the melted chocolate. Use a spoon to help coat the date evenly until fully covered with chocolate. Place the coated date onto a platter lined with parchment paper. Sprinkle additional crushed peanuts on top of each for garnish and extra texture.
- Chill: Transfer the platter with chocolate-covered dates to the refrigerator. Allow them to chill for sufficient time until the chocolate hardens and sets completely.
- Store: Keep any leftover chocolate covered dates in an airtight container in the fridge. They will stay fresh for up to one week.
Notes
- Use medjool dates for their natural softness and sweetness, making them ideal for stuffing.
- Feel free to substitute peanut butter with almond butter or other nut butters to suit dietary preferences.
- Ensure the coconut oil is fully incorporated into the chocolate for smooth coating.
- If you don’t have a microwave, you can melt chocolate and coconut oil in a double boiler on the stovetop.
- For a nut-free version, omit crushed peanuts and use a seed butter instead of peanut butter.
- Store the stuffed dates in the refrigerator to maintain the chocolate coating integrity and freshness.
Keywords: chocolate covered dates, stuffed dates, peanut butter stuffed dates, vegan dessert, gluten free sweets, dairy free chocolate treats, healthy snacking

