Japanese Cheesecake Recipe
Introduction
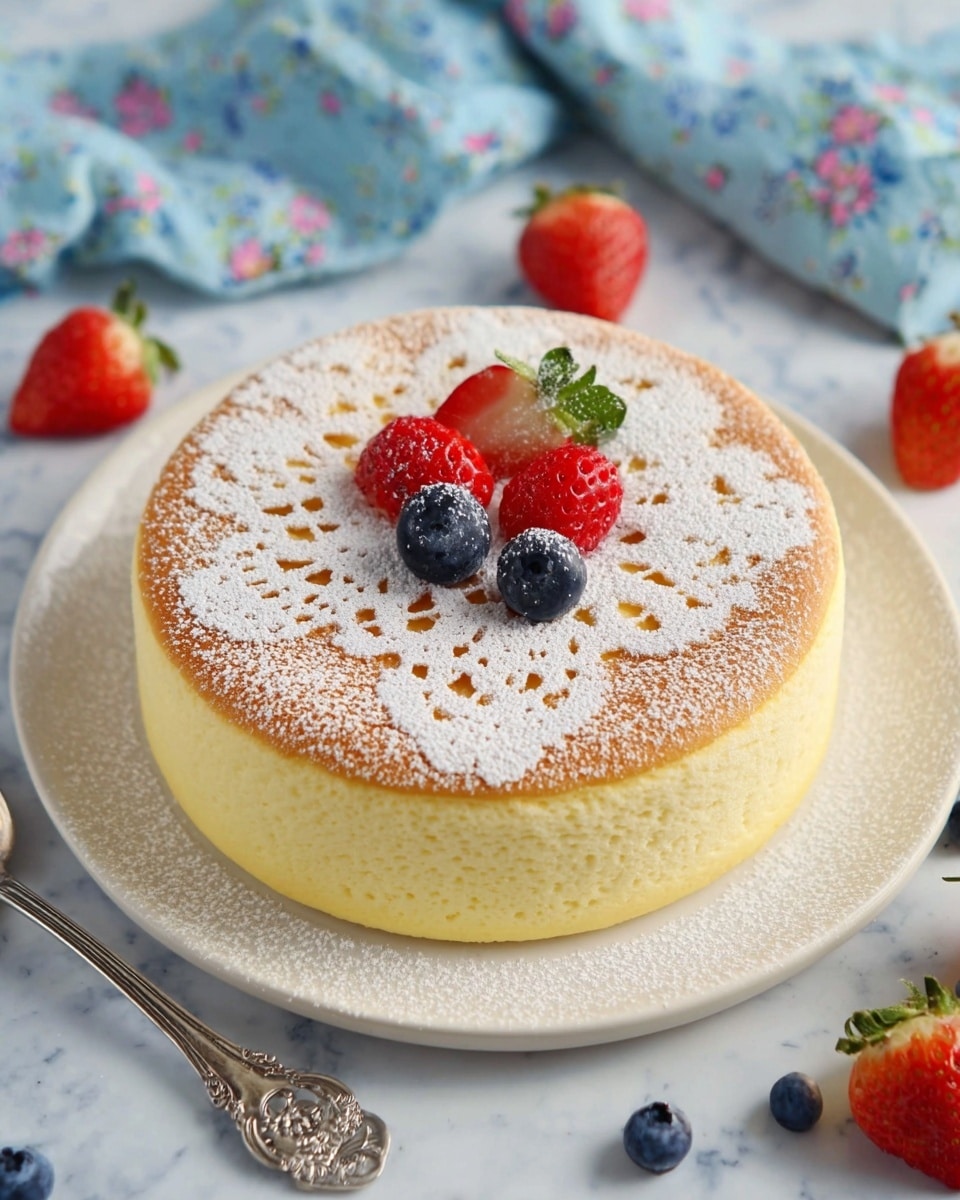
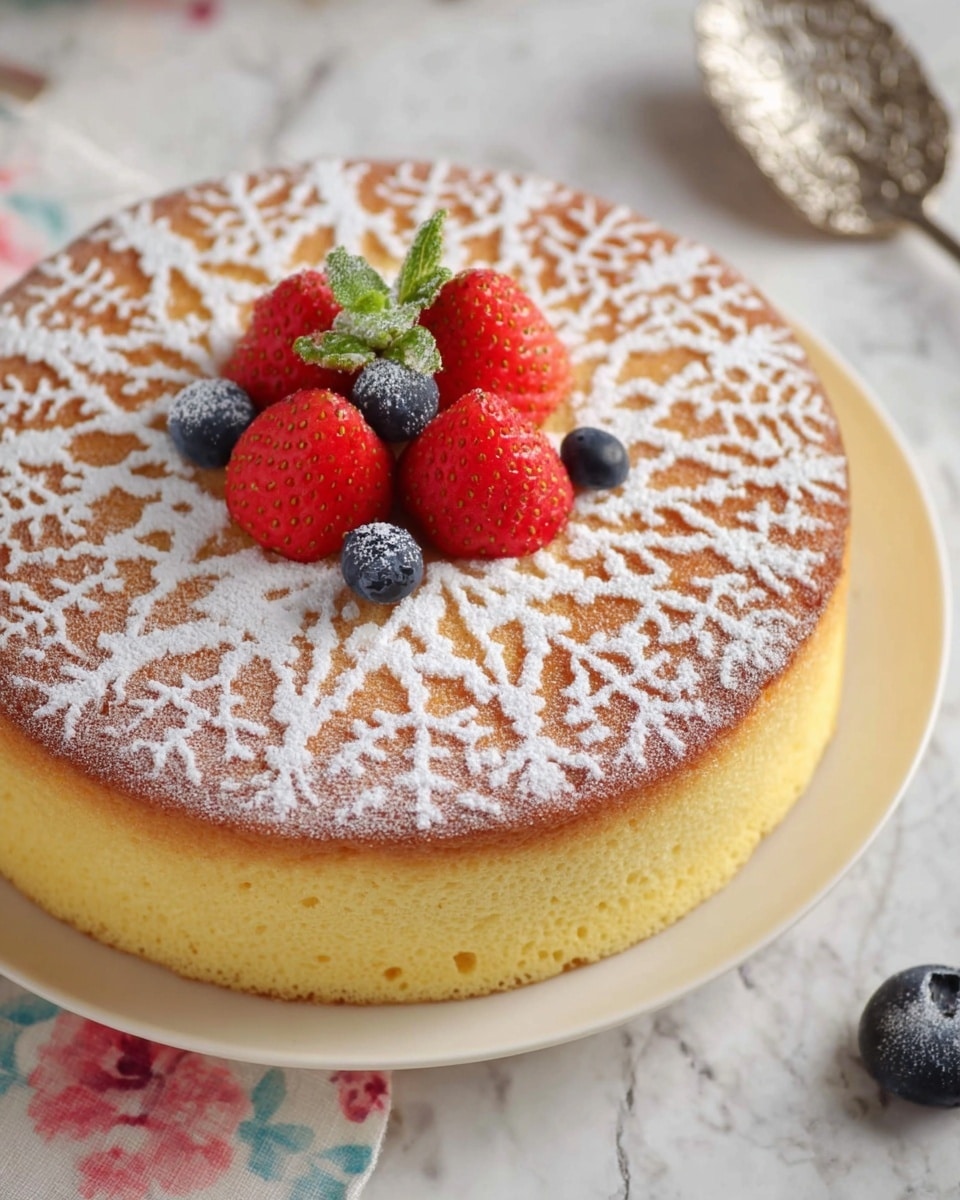
Japanese cheesecake is a delightfully light, fluffy dessert that combines the richness of cream cheese with an airy texture similar to souffle. It’s a perfect treat for those who love a balance of sweetness and creaminess without heaviness.
Ingredients
- 1 cup (8oz/225g) cream cheese
- 4 tablespoons (60g/2oz) butter
- 7 tablespoons (105g/3.5oz) milk
- 6 large eggs, separated
- 1 ½ tablespoons (22ml) lemon juice
- 2 teaspoons (10ml) vanilla extract
- ¾ cup (6oz/170g) granulated sugar, divided
- ¾ cup (3 ¾oz/105g) cake flour
- 2 ½ tablespoons corn starch
- ¼ teaspoon salt
- ¼ teaspoon cream of tartar
Instructions
- Step 1: Grease and line an 8-inch waterproof/leakproof springform tin. You can also use a 9-inch round cake pan wrapped tightly with tinfoil to prevent water leakage. Line a deep baking tray larger than the cake pan with a kitchen cloth to prepare for a water bath.
- Step 2: Melt the cream cheese, butter, and milk together in the microwave for about 1 ½ minutes. Whisk until smooth and lump-free.
- Step 3: Whisk in the egg yolks, lemon juice, vanilla extract, and half of the sugar until well combined.
- Step 4: Sift the cake flour, corn starch, and salt over the cream cheese mixture. Gently whisk to incorporate all dry ingredients without lumps. Set aside.
- Step 5: Using a mixer, beat the egg whites on medium speed until foamy. Add cream of tartar. When soft peaks form, gradually add the remaining sugar and continue beating until you get glossy, stiff peaks.
- Step 6: Fold one-third of the meringue into the cream cheese batter using a thin metal spoon to lighten the mixture. Then carefully fold in the remaining meringue until fully blended and airy.
- Step 7: Pour the batter into the prepared cake pan. Place the pan into the lined baking tray, then carefully pour boiling water into the tray until it reaches halfway up the sides of the cake pan, avoiding splashing water into the batter.
- Step 8: Bake on the bottom rack of a preheated oven at 400°F (200°C) for 18 minutes. Lower the temperature to 320°F (160°C) and bake for another 12 minutes. Turn off the oven, leave the door slightly open, and let the cake rest inside for 30 minutes. Then remove and cool completely at room temperature.
- Step 9: Carefully release the cheesecake from the pan onto a serving plate. Serve immediately or chill before serving.
Tips & Variations
- Use room temperature ingredients for better mixing and a smoother batter.
- Wrap the cake pan carefully with tinfoil to ensure no water seeps into the batter during the water bath baking.
- For a flavored twist, add a teaspoon of matcha powder to the dry ingredients or a swirl of fruit puree into the batter before folding in the meringue.
Storage
Store the cheesecake in an airtight container in the refrigerator for up to 3 days. It’s best enjoyed chilled but can be served at room temperature. Reheat gently for a few seconds in the microwave if preferred warm.
How to Serve
Serve this delicious recipe with your favorite sides.
FAQs
Why does Japanese cheesecake have a jiggly texture?
The light, jiggly texture comes from folding whipped egg whites into the batter, which incorporates air and creates a souffle-like softness that sets gently during baking.
Can I use a regular cake pan instead of a springform tin?
Yes, a 9-inch round cake pan wrapped tightly in tinfoil to prevent water leaks works well for the water bath method used in this recipe.
PrintJapanese Cheesecake Recipe
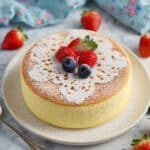
This Japanese Cheesecake is a light, airy, and fluffy dessert that combines the creamy richness of cream cheese with the delicate texture of a souffle. Baked in a water bath, it achieves a moist and tender crumb with a subtly sweet and tangy flavor, perfect for an elegant dessert or afternoon treat.
- Prep Time: 20 minutes
- Cook Time: 1 hour 10 minutes
- Total Time: 1 hour 30 minutes
- Yield: 8 servings 1x
- Category: Dessert
- Method: Baking
- Cuisine: Japanese
Ingredients
Cheesecake Base
- 1 cup (8oz/225g) cream cheese
- 4 tablespoons (60g/2oz) butter
- 7 tablespoons (105g/3.5oz) milk
- 6 large eggs, separated
- 1 ½ tablespoons (22ml) lemon juice
- 2 teaspoons (10ml) vanilla extract
- ¾ cup (6oz/170g) granulated sugar, divided
- ¾ cup (3 ¾oz/105g) cake flour
- 2 ½ tablespoons corn starch
- ¼ teaspoon salt
- ¼ teaspoon cream of tartar
Instructions
- Prepare the Pan and Water Bath: Grease and line an 8-inch waterproof/leakproof springform tin or a 9-inch round cake pan wrapped tightly with tinfoil. Line a deep baking tray with a kitchen cloth ensuring the tray is larger than the cake pan. This setup will be used as a water bath to gently bake the cheesecake, promoting moisture and a smooth texture.
- Melt and Mix Cream Cheese Base: Microwave the cream cheese, butter, and milk together for about 1 ½ minutes until melted, then whisk vigorously until smooth and lump-free.
- Add Yolks and Flavoring: Whisk in the egg yolks, lemon juice, vanilla extract, and half of the sugar (about 3/8 cup) thoroughly into the cream cheese mixture.
- Sift Dry Ingredients: Using a sieve, gradually add the cake flour, corn starch, and salt into the cream cheese batter, whisking gently to combine until smooth without lumps. Set this batter aside.
- Make Meringue: Using a stand or hand mixer with the whisk attachment, whip the egg whites on medium speed until foamy. Add cream of tartar once the mixture has begun to thicken. Gradually add the remaining sugar while continuing to whip until the meringue is glossy, voluminous, and holds stiff peaks.
- Fold Meringue into Batter: Gently fold one-third of the meringue into the cream cheese batter with a thin metal spoon to lighten the mixture. Then carefully fold in the remaining meringue in two additions, cutting and folding swiftly but gently to maintain the airiness in the batter.
- Assemble and Bake in Water Bath: Pour the combined batter into the prepared pan. Place the cake pan inside the larger tray and pour boiling water into the tray until it reaches halfway up the cake pan’s sides, avoiding water splashes into the batter.
- Bake with Temperature Adjustments: Bake on the bottom rack of a preheated oven at 400°F (200°C) for 18 minutes. Then reduce the oven temperature to 320°F (160°C) and bake for an additional 12 minutes. Afterward, turn the oven off, slightly open the oven door, and let the cheesecake sit for 30 minutes to prevent cracking from rapid cooling.
- Cool and Serve: Remove the cheesecake from the water bath and oven, and allow it to cool to room temperature. Once cool, carefully release the cake from the pan and transfer it onto a serving plate. Store leftovers in an airtight container in the refrigerator for up to 3 days.
Notes
- Ensure the pan is properly waterproofed to prevent water leaks during the water bath baking.
- Folding the meringue gently is key to maintaining the cheesecake’s airy texture.
- Do not skip the cooling step with the oven door slightly open to avoid cracks on the cheesecake surface.
- This cheesecake is best served chilled or at room temperature for optimal flavor and texture.
Keywords: Japanese cheesecake, fluffy cheesecake, souffle cheesecake, water bath cheesecake, light cheesecake, baked cheesecake recipe
