Instant Sponge Dosa Recipe
If you are craving a quick and irresistibly fluffy South Indian treat, Instant Sponge Dosa is here to become your new go-to recipe. This dosa is wonderfully light and airy, with a delicate texture that melts in your mouth, yet it can be whipped up in a fraction of the time compared to traditional dosas. Made with simple pantry staples like poha, rava, and curd, this Instant Sponge Dosa delivers incredible taste with minimal effort, perfect for breakfast, snacks, or even a comforting dinner option.
Ingredients You’ll Need
Each ingredient in this recipe is a superstar on its own, contributing to the dosa’s signature softness, tanginess, and crisp edges. The combination is effortless yet essential for getting that perfect spongy texture you’ll love.
- Thin poha (1 cup): Adds a subtle softness and helps ferment the batter quickly for extra fluffiness.
- Rava/Suji/Semolina (1 cup): The coarse texture balances the smooth batter and lends a slight crunch to the dosa edges.
- Curd/Yoghurt (1 cup): Brings in a pleasant tang and activates the natural fermentation process, making your dosa light.
- Salt (1 tsp): Essential to enhance all the flavors perfectly.
- Water (1 cup + 1 tbsp): Used in stages to get the smooth, pourable batter consistency just right.
- Eno/Fruit Salt (½ tsp) or Baking Soda/Baking Powder: The secret leavening agent that puffs up the dosa beautifully.
- Oil (as required): For cooking, adding a fine crispness and preventing sticking.
How to Make Instant Sponge Dosa
Step 1: Prepare the Poha
Begin by rinsing the poha thoroughly with water to soften it without making it mushy. Squeeze out excess water carefully to keep the poha moist but not soaked, as this moisture is crucial for the spongy batter base.
Step 2: Mix the Dry Ingredients and Curd
Add the rinsed poha to a mixing bowl with rava, curd, and salt. Stir them together until well combined. The combination of curd and poha gives the batter its natural tang and helps in fermentation, which is the key for that airy texture.
Step 3: Let the Batter Rest
Pour in half a cup of water, mix, then cover the bowl and set it aside to rest for 15 to 30 minutes. This resting allows the ingredients to meld and soften further, setting the stage for an ultra-light Instant Sponge Dosa.
Step 4: Grind to Smooth Batter
After resting, add the remaining water and transfer the mixture to a grinder. Grind until smooth and creamy. This grinding step is vital because a silky batter ensures your dosa spreads evenly on the pan, forming that classic thin yet spongy texture.
Step 5: Add the Leavening Agent
Transfer the smooth batter back into a bowl. Sprinkle in the eno or fruit salt, add a tablespoon of water, and gently mix. You’ll see the batter foam up slightly—this bubbling action is what will make your dosa delightfully sponge-like.
Step 6: Heat and Prepare Your Pan
Turn on a non-stick tawa over high heat. Splash a little water on the surface and wipe it clean to create a hot, damp cooking surface. Add about a quarter teaspoon of oil and spread it evenly with a tissue paper for a perfect non-stick layer.
Step 7: Cook the Dosa
Pour a ladle of batter onto the hot tawa and let it spread naturally—do not attempt to spread it yourself. Cook on a high flame until bubbles form across the surface, then reduce to medium heat and let it cook until the top is set and slightly dry. This balancing act of heat ensures a crispy bottom and soft, spongy top.
Step 8: Serve and Enjoy
Carefully lift the dosa off the pan using a spatula. Your Instant Sponge Dosa is ready to enjoy—serve it hot for the best experience!
How to Serve Instant Sponge Dosa
Garnishes
While the dosa itself is fantastic on its own, garnishing with a drizzle of melted ghee or a sprinkle of finely chopped coriander can elevate the flavors beautifully. For a touch of richness, try adding a dollop of butter right after cooking.
Side Dishes
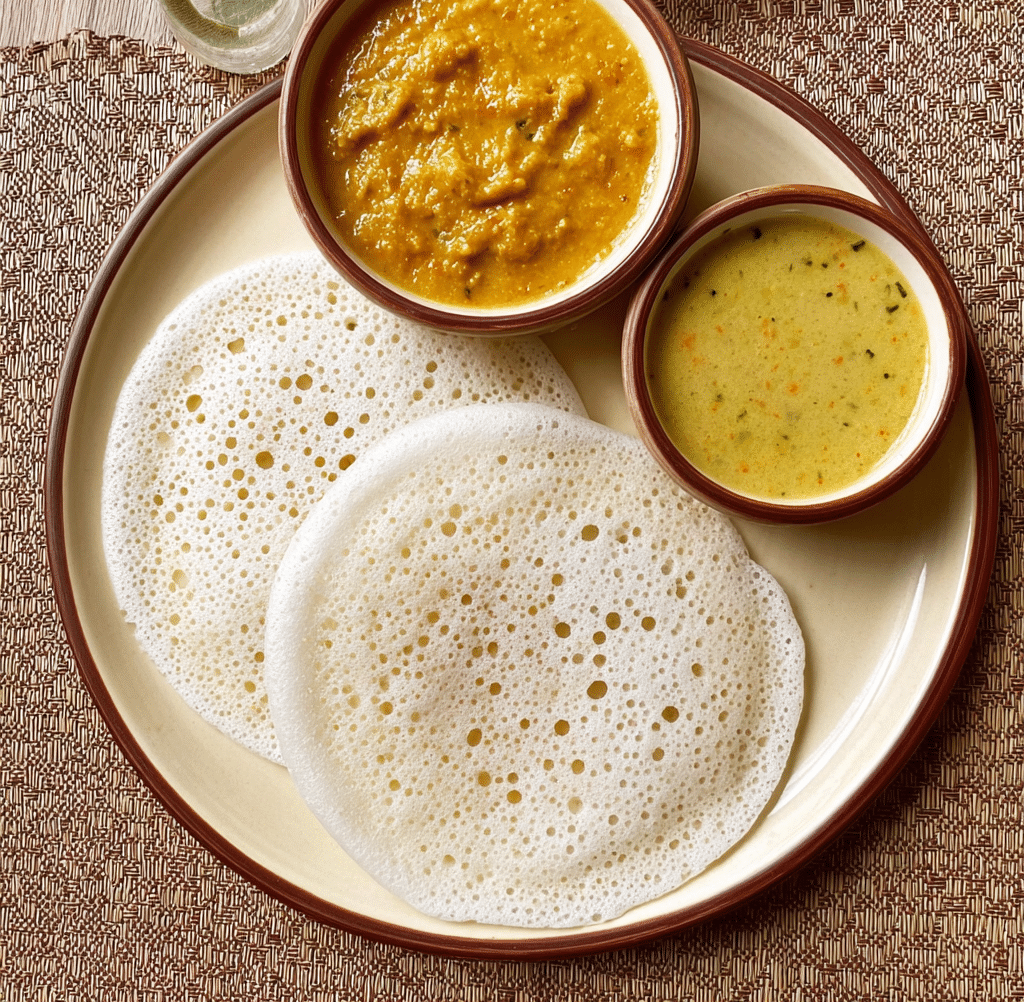
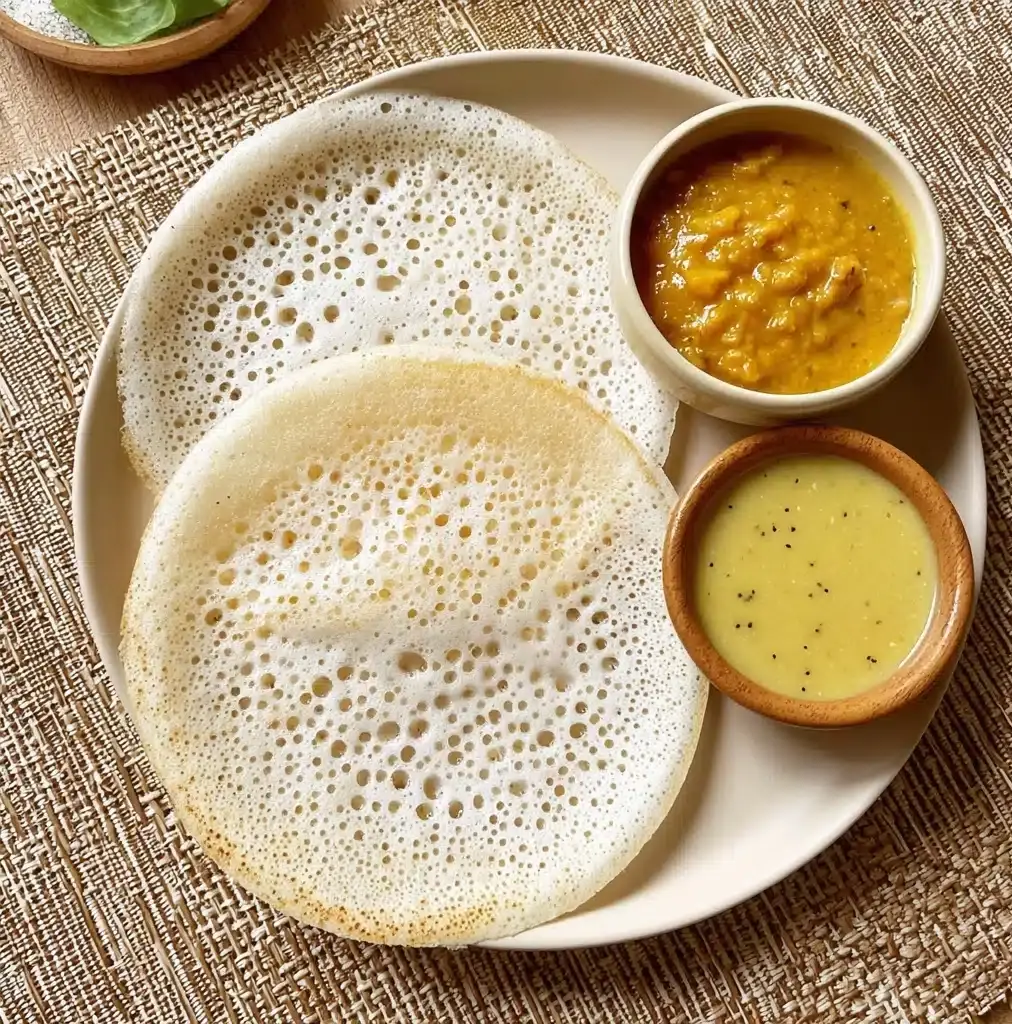
Traditionally, Instant Sponge Dosa pairs wonderfully with tangy sambar and creamy coconut chutney. The warmth of the sambar and freshness of the chutney balance the dosa’s mild tang and spongy texture perfectly, making each bite a delightful harmony of flavors.
Creative Ways to Present
Try rolling your dosa with spiced potato filling inside to make a quick masala dosa or serve small squares topped with a variety of chutneys and a sprinkle of sev for an Indian street-food-inspired snack. You can also create bite-sized dosa cups and fill them with curried vegetables or paneer for a fun appetizer twist.
Make Ahead and Storage
Storing Leftovers
If you have any leftover Instant Sponge Dosa, store them in an airtight container in the refrigerator. They remain moist and tender for about 1 to 2 days, making them perfect for quick reheating and snacking later.
Freezing
To freeze, stack the dosas with parchment paper between each layer to prevent sticking and place them in a freezer-safe bag. They can be frozen for up to a month. This way, you have a ready supply of fluffy Instant Sponge Dosa whenever hunger strikes.
Reheating
For the best texture upon reheating, warm the dosa on a hot griddle or tawa rather than the microwave. This method revives the slight crispness while maintaining the soft sponge inside, restoring the dosa closer to its fresh-cooked glory.
FAQs
Can I use thick poha instead of thin poha?
Yes, you can use thick poha but reduce the quantity to a quarter cup to avoid making the batter too dense. Thin poha is preferred because it softens quickly and blends seamlessly into the batter.
Is it necessary to grind the batter?
Grinding the batter is important for achieving a smooth, uniform consistency that spreads easily and cooks evenly. If you skip grinding, your dosa might end up coarse and less fluffy.
What if I don’t have eno or fruit salt?
You can substitute with ¼ teaspoon baking soda or ½ teaspoon baking powder. These leavening agents will help create the sponge-like texture by releasing air bubbles in the batter.
Can I make this dosa vegan?
Absolutely! Replace the curd with plant-based yogurt alternatives like coconut or almond yogurt. The poha and rava will still absorb moisture well, keeping the dosa light and fluffy.
Why is my dosa not turning out spongy?
If your dosa isn’t spongy, check that you are using fresh eno or leavening agent and adding enough water for a smooth batter. Also, don’t skip the resting period, and ensure you cook on the right heat—too low or uneven heat can affect the sponge texture.
Final Thoughts
Once you try this Instant Sponge Dosa, it’s hard to go back to regular dosas for everyday meals. Its quick preparation paired with a satisfyingly soft and airy texture makes it perfect for busy mornings or last-minute cravings. Trust me, this recipe is destined to become a beloved staple in your kitchen, bringing smiles with every bite!
PrintInstant Sponge Dosa Recipe
Instant Sponge Dosa is a quick and easy South Indian breakfast made with poha, semolina, and yogurt. This fluffy and soft dosa requires no fermentation, making it a perfect choice for a fast, delicious meal. Served best with sambar and coconut chutney, this recipe offers a wonderful balance of flavors and textures.
- Prep Time: 10 minutes
- Cook Time: 15 minutes
- Total Time: 25 minutes
- Yield: 4 servings 1x
- Category: Breakfast
- Method: Grinding and Pan Cooking
- Cuisine: South Indian
- Diet: Vegetarian
Ingredients
Main Ingredients
- 1 cup thin poha (or ¼ cup thick poha)
- 1 cup rava/suji/semolina (coarse)
- 1 cup curd/yoghurt
- 1 tsp salt
- 1 cup + 1 tbsp water
- ½ tsp eno or fruit salt (or ¼ tsp baking soda or ½ tsp baking powder)
- Oil (as required)
Instructions
- Rinse Poha: In a bowl, add poha and rinse thoroughly with water to remove any impurities.
- Drain Poha: Squeeze out all the water from the poha and transfer it to a clean bowl.
- Mix Dry Ingredients: Add rava, curd, and salt to the poha and mix well to combine.
- Add Water and Rest: Add ½ cup water to the mixture, mix thoroughly, cover, and let it rest for 15-30 minutes to allow rava to soften.
- Add Remaining Water and Grind: Add the remaining ½ cup water and transfer the batter to a grinder jar.
- Grind Batter: Grind the mixture to make a smooth, lump-free batter.
- Prepare Batter: Transfer the batter back to a bowl.
- Add Leavening Agent: Add eno and 1 tbsp water to the batter and mix well. The batter will become frothy and light.
- Heat Tawa: Heat a non-stick tawa (griddle) over high flame.
- Prepare Surface: Splash some water on the hot tawa and wipe it clean with a cloth.
- Apply Oil: Add ¼ tsp oil and spread it evenly on the tawa surface with tissue paper.
- Pour Batter: Pour a ladleful of batter onto the hot tawa. Allow it to spread on its own; do not spread manually.
- Cook on High Flame: Cook the dosa on high flame until bubbles appear on the surface.
- Cook on Medium Flame: Lower the flame to medium and cook until the dosa surface is set and cooked through.
- Remove Dosa: Once cooked, use a spatula to gently remove the dosa from the tawa.
- Serve: Your instant sponge dosa is ready! Serve hot with sambar and coconut chutney.
Notes
- Use thin poha for a softer dosa; thick poha can be used but reduce the quantity accordingly.
- Ensure the batter is ground smooth for better texture.
- Resting the batter helps rava absorb the moisture and improves consistency.
- Adding eno just before cooking gives the dosa its spongy texture.
- Adjust salt to taste.
- Serve immediately for best taste and texture.
Nutrition
- Serving Size: 1 dosa (approx. 100g)
- Calories: 150 kcal
- Sugar: 2 g
- Sodium: 300 mg
- Fat: 4 g
- Saturated Fat: 0.7 g
- Unsaturated Fat: 2.5 g
- Trans Fat: 0 g
- Carbohydrates: 25 g
- Fiber: 1.5 g
- Protein: 5 g
- Cholesterol: 5 mg
Keywords: Instant Sponge Dosa, Quick Dosa Recipe, South Indian Breakfast, Poha Dosa, Rava Dosa, Easy Dosa Recipe


