Iced Peppermint Cookies Recipe
Introduction
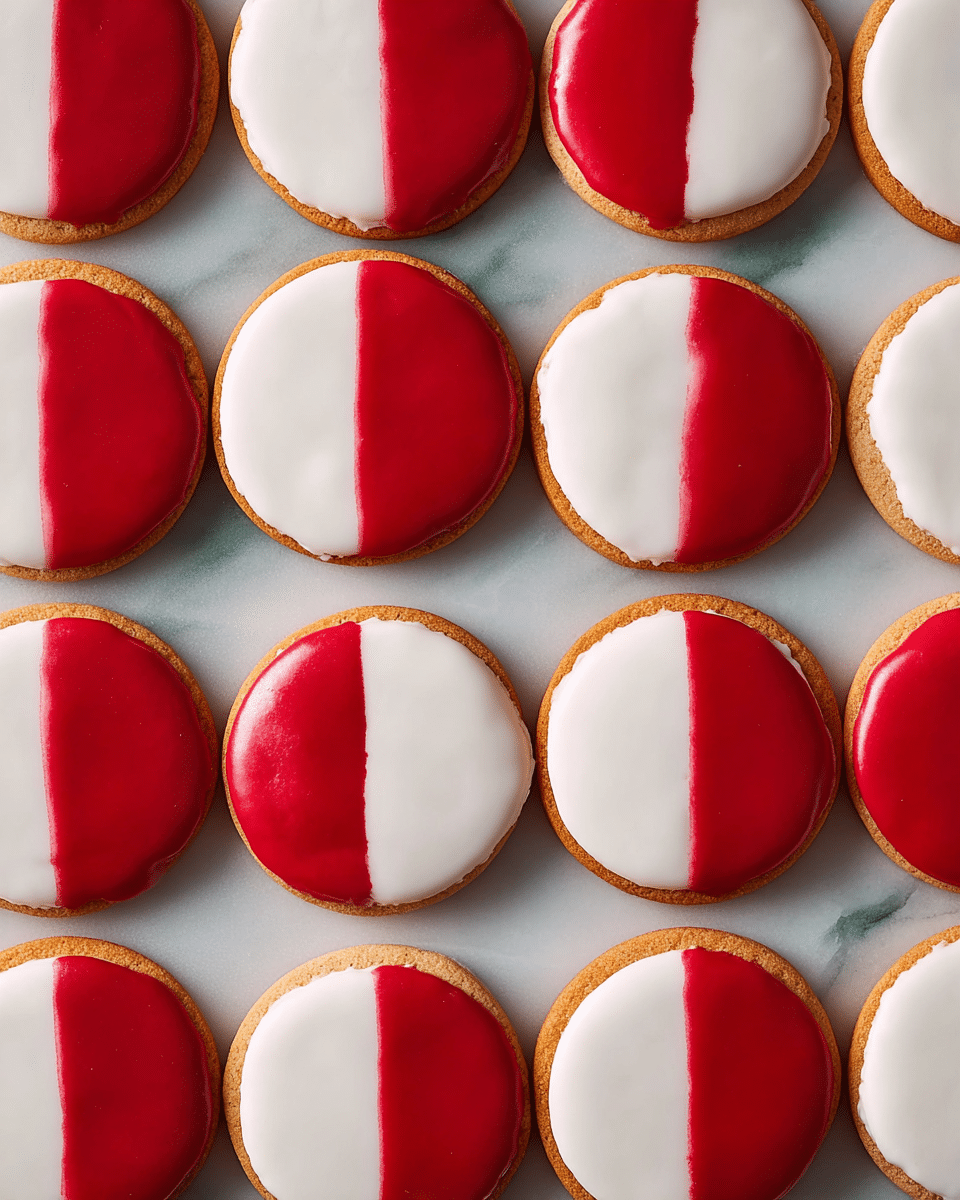
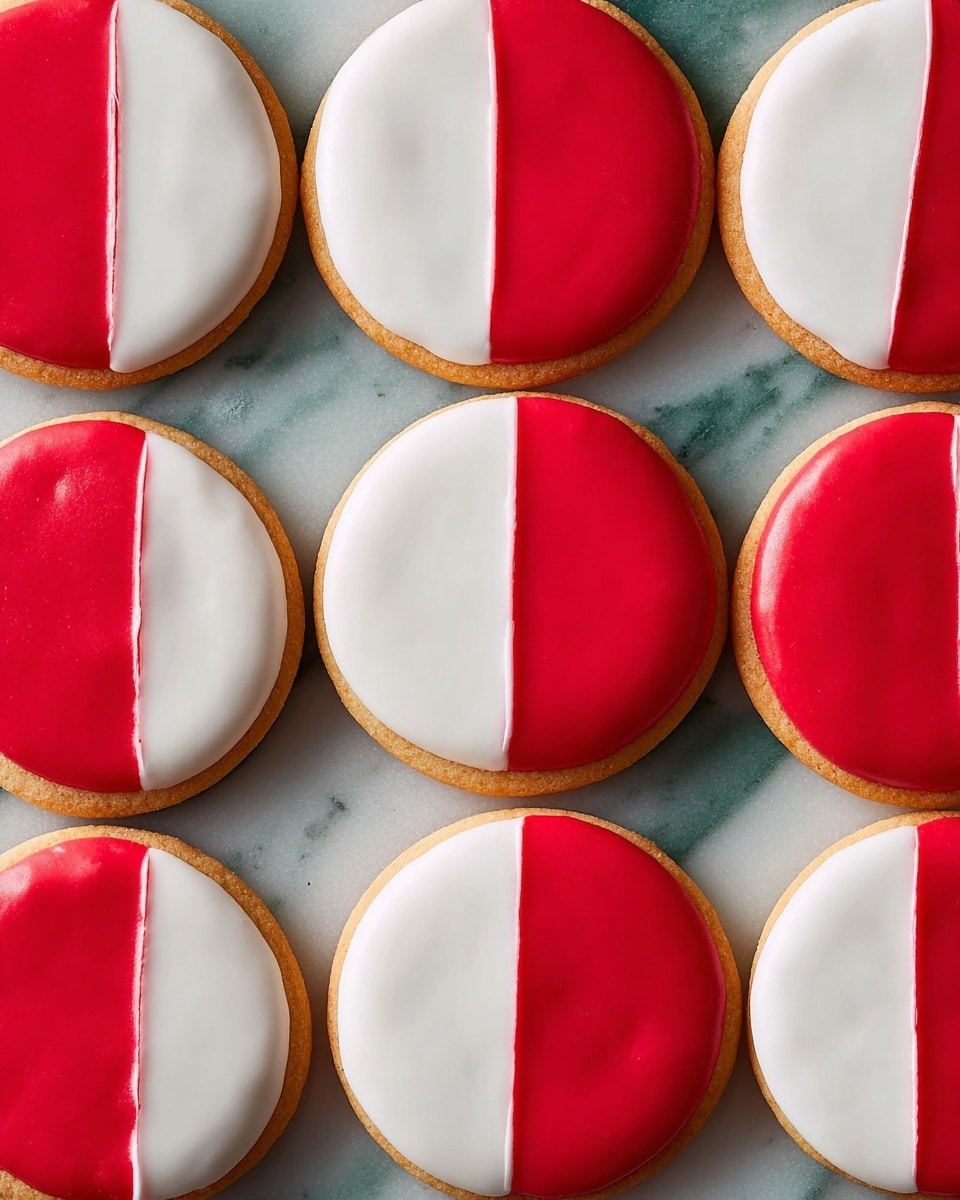
These Iced Peppermint Cookies are a festive treat perfect for holiday gatherings or anytime you crave a refreshing minty bite. Soft, buttery cookies are topped with a glossy peppermint royal icing in classic red and white. They’re as delightful to look at as they are to eat.
Ingredients
- 2 1/4 cups (298 grams) all-purpose flour
- 1 teaspoon fine sea salt or table salt
- 1/2 teaspoon baking powder
- 1 cup (230 grams) unsalted butter, at room temperature, plus more for pan
- 3/4 cup (149 grams) granulated sugar
- 1 large egg yolk
- 1/8 to 1/4 teaspoon peppermint extract
- 3 ¾ cups (454 grams) powdered sugar
- 3 large egg whites
- 1/2 teaspoon cream of tartar
- Pinch of fine sea salt or table salt
- 3 drops peppermint extract, plus more to taste
- Food coloring, as needed
Instructions
- Step 1: In a large bowl, sift together the flour, salt, and baking powder.
- Step 2: Using an electric mixer fitted with the paddle attachment, beat the butter and granulated sugar on medium speed until fluffy and lightened in color, about 2 to 4 minutes. Add the egg yolk and peppermint extract, mixing until combined.
- Step 3: With the mixer on low, gradually add the flour mixture, beating until just incorporated. Scrape down the bowl as needed to ensure even mixing.
- Step 4: Gather the dough into a ball and press it into a 1-inch-thick disk. Wrap in plastic wrap and refrigerate for at least 1 hour. The dough can be stored in the refrigerator for up to 5 days or frozen for up to 2 months. Thaw in the fridge overnight before using.
- Step 5: Preheat the oven to 350°F (175°C). Line two baking sheets with parchment paper.
- Step 6: Roll out the chilled dough between two sheets of parchment paper until 1/4-inch thick. Remove the top parchment and use a floured 2-inch round cookie cutter to cut out cookies. Place them on the prepared sheets at least 1/2 inch apart. Reroll scraps as needed to make more cookies.
- Step 7: Bake for 13 to 17 minutes, rotating the pans halfway through baking, until the edges and bottoms are browned. Transfer cookies to wire racks to cool completely.
- Step 8: Prepare the royal icing by combining powdered sugar, egg whites, cream of tartar, salt, and peppermint extract in a mixer bowl fitted with the whisk attachment. Whisk on high speed until stiff and glossy. Add water a few drops at a time if the icing is too thick. Adjust peppermint extract to taste for a strong mint flavor.
- Step 9: Divide the icing into two bowls. Leave one white and cover with plastic wrap to prevent drying. Tint the other with red food coloring until vibrant, stirring well and tapping to remove air bubbles.
- Step 10: Spoon red icing onto one half of each cookie, aiming for a clean line down the center. Allow to dry, then spoon white icing on the other half. Let the cookies sit until the icing is fully set.
Tips & Variations
- For a stronger peppermint flavor that lasts, increase the peppermint extract in both dough and icing, especially if storing cookies for several days.
- Use gel food coloring for bright, vivid icing without altering consistency.
- To create a festive look, try swirling the red and white icings together before they dry.
- Make smaller cookies by using a 1 1/2-inch cutter for bite-size treats.
Storage
Store iced cookies in an airtight container at room temperature for up to 5 days. For longer storage, keep them in the refrigerator for up to 2 weeks or freeze un-iced cookies for up to 2 months. If frozen, thaw cookies overnight in the fridge before decorating. Let iced cookies dry fully before stacking or storing to prevent smudging.
How to Serve
Serve this delicious recipe with your favorite sides.
FAQs
Can I use peppermint oil instead of peppermint extract?
Yes, but peppermint oil is much more concentrated. Use it sparingly—start with a drop and adjust carefully to avoid overpowering the cookies.
Is it safe to use raw egg whites in royal icing?
Raw egg whites are traditional in royal icing for a glossy finish but carry a slight risk of salmonella. You can use pasteurized egg whites or meringue powder as a safer alternative.
PrintIced Peppermint Cookies Recipe

These Iced Peppermint Cookies are festive, crisp, and perfectly sweet with a refreshing peppermint flavor in both the cookie and the glossy royal icing. Rolled thin and baked to a light golden brown, they’re ideal for holiday celebrations or any time you crave a cool minty treat.
- Prep Time: 20 minutes
- Cook Time: 15 minutes
- Total Time: 1 hour 35 minutes
- Yield: About 24 cookies (2-inch rounds) 1x
- Category: Dessert
- Method: Baking
- Cuisine: American
Ingredients
Cookie Dough
- 2 1/4 cups (298 grams) all-purpose flour
- 1 teaspoon fine sea salt or table salt
- 1/2 teaspoon baking powder
- 1 cup (230 grams) unsalted butter, at room temperature, plus more for pan
- 3/4 cup (149 grams) granulated sugar
- 1 large egg yolk
- 1/8 to 1/4 teaspoon peppermint extract
Royal Icing
- 3 ¾ cups (454 grams) powdered sugar
- 3 large egg whites
- 1/2 teaspoon cream of tartar
- Pinch of fine sea salt or table salt
- 3 drops peppermint extract, plus more to taste
- Food coloring (red), as needed
Instructions
- Mix Dry Ingredients: In a large bowl, sift together the flour, salt, and baking powder to ensure even distribution.
- Cream Butter and Sugar: Using an electric mixer fitted with the paddle attachment, beat the unsalted butter and granulated sugar on medium speed until the mixture is fluffy and lightened in color, about 2 to 4 minutes. Then beat in the egg yolk and peppermint extract until fully combined.
- Incorporate Dry Ingredients: Set the mixer to low speed and gradually add the sifted flour mixture, mixing just until incorporated. Scrape down the sides as needed to make sure the dough comes together evenly.
- Chill the Dough: Form the dough into a ball and flatten it into a 1-inch-thick disk. Wrap tightly with plastic wrap and refrigerate for at least 1 hour. The dough can be stored refrigerated for up to 5 days or frozen for up to 2 months. Thaw frozen dough overnight in the fridge before use.
- Prepare for Baking: When ready, preheat the oven to 350°F (175°C). Line two baking sheets with parchment paper.
- Roll and Cut Dough: Unwrap the chilled dough and place it between two sheets of parchment paper. Roll it out to about 1/4-inch thickness. Remove the top sheet of parchment and use a floured 2-inch round cookie cutter to stamp out cookies. Arrange them at least 1/2 inch apart on the prepared sheets. Re-roll scraps to make additional cookies.
- Bake the Cookies: Bake the cookies for 13 to 17 minutes, rotating the pans halfway through baking until the edges and bottoms are golden brown. Transfer baked cookies to wire racks to cool completely.
- Prepare Royal Icing: In a clean mixing bowl fitted with the whisk attachment, combine powdered sugar, egg whites, cream of tartar, salt, and 3 drops of peppermint extract. Whisk on high speed until the mixture is stiff and glossy. Add water a little at a time if icing is too thick for spreading. Taste and adjust peppermint extract as needed to maintain a strong flavor.
- Tint the Icing: Divide the royal icing into two small bowls. Cover one bowl with plastic wrap to keep it from drying out — this will remain white. Stir red food coloring into the other bowl until you achieve a vibrant, even color. Tap bowls lightly to remove air bubbles.
- Decorate the Cookies: Working one cookie at a time, spoon the red icing onto one half of the cookie, aiming for a clean, straight line through the center. Allow the red icing to dry completely. Then spoon the white icing onto the other half of the cookie and let the icing set fully before handling or storing.
Notes
- The peppermint flavor in the icing fades over a few days, so increase the peppermint extract if you plan to keep the cookies longer than two days.
- Dough can be made ahead and refrigerated for up to 5 days or frozen for up to 2 months, making these cookies ideal for preparation in advance.
- Use parchment paper for rolling the dough to avoid sticking and make transferring easier.
- Ensure egg whites used in the royal icing are fresh and pasteurized if serving to vulnerable populations.
- When coloring the icing, mix gently to avoid creating air bubbles that can mar the icing finish.
Keywords: peppermint cookies, iced cookies, holiday cookies, royal icing, peppermint extract, festive cookies

