Icebox Slice & Bake Cookies (5 Flavors) Recipe
Introduction
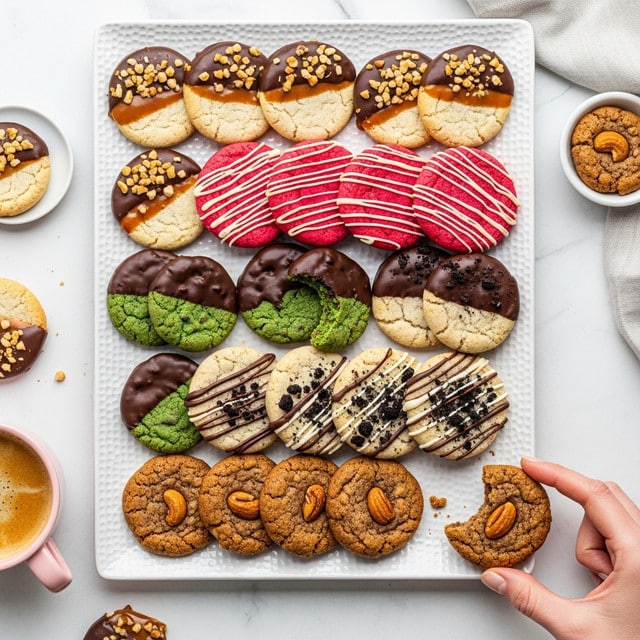
Icebox slice & bake cookies are a classic treat that’s both easy to prepare and endlessly customizable. With five different flavor options, these cookies offer something for every taste and come together perfectly for make-ahead baking.
Ingredients
- 3/4 cup (12 Tbsp; 170g) unsalted butter, softened to room temperature
- 1/2 cup (100g) packed light or dark brown sugar
- 1/4 cup (50g) granulated sugar
- 1 large egg, at room temperature
- 1 teaspoon pure vanilla extract
- 2 cups + 2 Tablespoons (267g) all-purpose flour (spooned & leveled)
- 1/4 teaspoon salt
- Coarse sugar for rolling (optional, such as sparkling sugar)
- Add-ins & toppings (see Notes for specific flavor variations)
Instructions
- Step 1: In a large bowl, use a handheld mixer or stand mixer fitted with a paddle attachment to beat the butter, brown sugar, and granulated sugar on medium-high speed until creamy, about 3 minutes. Beat in the egg and vanilla extract on high speed until fully combined, scraping the bowl as needed.
- Step 2: Add the flour and salt, beating on low speed until combined. Then, beat in the chosen flavor add-ins on low speed just until evenly distributed. If the dough is too sticky to roll, mix in 1–2 tablespoons more flour.
- Step 3: Turn the dough onto a floured surface and divide it in half. Roll each half into an 8-inch log about 1.5 to 2 inches in diameter. Wrap tightly in plastic wrap and chill in the refrigerator for at least 4 hours, up to 5 days.
- Step 4: When ready to bake, preheat the oven to 350°F (177°C) and line baking sheets with parchment paper or silicone mats.
- Step 5: Optional: Pour coarse sugar onto a plate and roll the chilled dough logs in the sugar, pressing gently to help it stick.
- Step 6: Slice each log into 12 equally thick cookies. Place cookies on prepared baking sheets about 2 inches apart.
- Step 7: Bake for 13–15 minutes or until the edges are lightly browned. Let cookies cool on the baking sheet for 5 minutes, then transfer to a rack to cool completely.
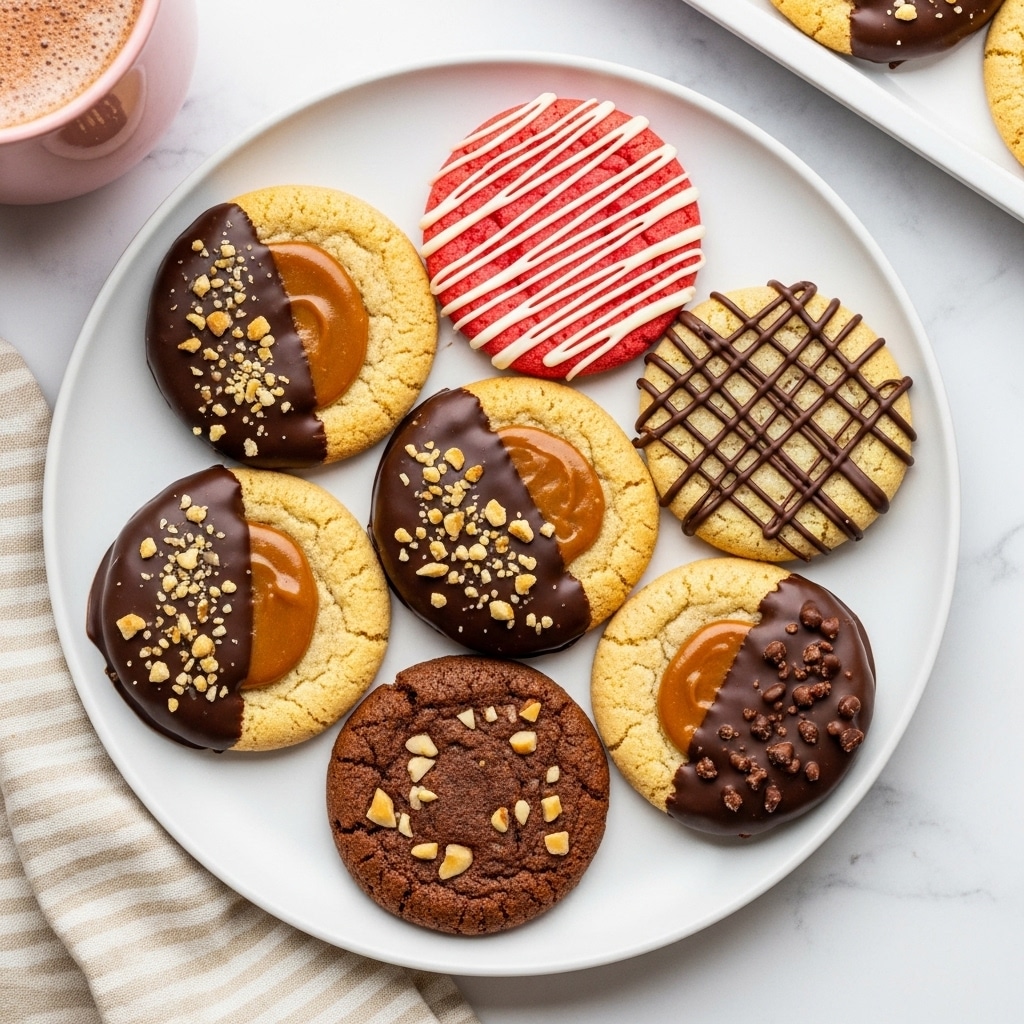
- Step 8: Optional: Dip, drizzle with melted chocolate, or add toppings as desired.
Tips & Variations
- If the dough feels too sticky, adding a little extra flour helps make rolling easier without drying out the cookies.
- Chilling the dough logs thoroughly ensures cleaner slices and better cookie shape during baking.
- Try flavor variations like chocolate chips, nuts, dried fruit, or spices for creative twists.
- Rolling the logs in coarse sugar after chilling helps create a sparkling, crisp exterior.
Storage
Store the cooled cookies in an airtight container at room temperature for up to one week. For longer storage, freeze the sliced dough logs before baking, or freeze baked cookies for up to three months. Reheat baked cookies briefly in a low oven or microwave to refresh their texture.
How to Serve
Serve this delicious recipe with your favorite sides.
FAQs
Can I make the dough ahead of time?
Yes, the dough logs can be refrigerated for up to 5 days before baking, making them convenient for planning ahead.
How do I prevent cookies from spreading too much?
Chilling the dough logs well before slicing helps maintain their shape and reduces spreading in the oven.
PrintIcebox Slice & Bake Cookies (5 Flavors) Recipe

These Icebox Slice & Bake Cookies are a versatile and delicious treat that can be customized with five different flavors. The dough is prepared, chilled in logs, sliced, baked until lightly golden, and optionally finished with melted chocolate and toppings. Perfect for making ahead and enjoying fresh homemade cookies anytime.
- Prep Time: 15 minutes
- Cook Time: 15 minutes
- Total Time: 4 hours 30 minutes
- Yield: 24 cookies (2 logs, 12 slices each) 1x
- Category: Dessert
- Method: Baking
- Cuisine: American
- Diet: Vegetarian
Ingredients
Cookie Dough
- 3/4 cup (12 Tbsp; 170g) unsalted butter, softened to room temperature
- 1/2 cup (100g) packed light or dark brown sugar
- 1/4 cup (50g) granulated sugar
- 1 large egg, at room temperature
- 1 teaspoon pure vanilla extract
- 2 cups + 2 Tablespoons (267g) all-purpose flour (spooned & leveled)
- 1/4 teaspoon salt
Add-ins & Toppings
- Coarse sugar for rolling, such as sparkling sugar
- Flavor-specific add-ins (see Notes below for full details on flavors and measurements)
Instructions
- Cream Butter and Sugars: In a large bowl using a handheld or stand mixer fitted with a paddle attachment, beat the softened butter, brown sugar, and granulated sugar on medium-high speed until creamy and combined, about 3 minutes. This step ensures a fluffy base for the cookies.
- Add Egg and Vanilla: Beat in the large egg and vanilla extract on high speed. Scrape down the sides and bottom of the bowl as needed to fully incorporate the ingredients.
- Mix Dry Ingredients: Add the all-purpose flour and salt, then beat on low speed until just combined to form the cookie dough. Avoid overmixing.
- Add Flavor Mix-Ins: Beat in your chosen flavor add-ins on low speed until evenly distributed, taking care not to overmix. The dough should be thick and slightly sticky; if too sticky, add 1-2 tablespoons more flour.
- Shape the Dough Logs: Turn the dough onto a floured surface. Divide in half and roll each half into an approximately 8-inch log, about 1.5 to 2 inches in diameter. Wrap tightly in plastic wrap.
- Chill Dough: Refrigerate the dough logs for at least 4 hours or up to 5 days to firm up the dough, making it easier to slice.
- Preheat Oven: When ready to bake, preheat oven to 350°F (177°C) and line baking sheets with parchment paper or silicone baking mats.
- Optional Sugar Coating: Spread coarse sugar on a plate and roll the chilled dough logs in the sugar, pressing firmly to adhere.
- Slice Cookies: Cut each log into 12 equal slices, about 1/2 inch thick, and place the slices on prepared baking sheets about 2 inches apart.
- Bake: Bake for 13-15 minutes or until edges are very lightly browned. Cookies won’t brown much, so watch carefully to avoid overbaking.
- Cool Cookies: Let cookies cool on baking sheets for 5 minutes, then transfer to a wire rack to cool completely.
- Finish with Chocolate and Toppings: If desired, dip or drizzle cookies with melted chocolate and add additional toppings as preferred.
- Store: Store cookies covered at room temperature for up to 1 week to keep fresh.
Notes
- Flavor Add-ins examples include mix-ins like chocolate chips, nuts, dried fruit, or extracts depending on desired flavor variation. Adjust the amounts to suit your taste.
- Chilling the dough is essential to achieve sliceable logs that hold shape while baking.
- Rolling in coarse or sparkling sugar adds extra texture and sweetness to the cookie edges.
- Use room temperature butter and egg to ensure proper creaming and dough consistency.
- Adding extra flour may be necessary if dough is too sticky to handle after mixing add-ins.
- Cookies are not expected to brown heavily; bake until just lightly golden to prevent drying out.
- Melted chocolate finishing is optional but adds a nice touch and additional flavor dimension.
Keywords: slice and bake cookies, icebox cookies, homemade cookies, easy cookie recipe, versatile cookie dough, chocolate chip cookies, cookie logs, make ahead cookies
