Giant Peanut Butter Cup Rice Cake Recipe
Introduction
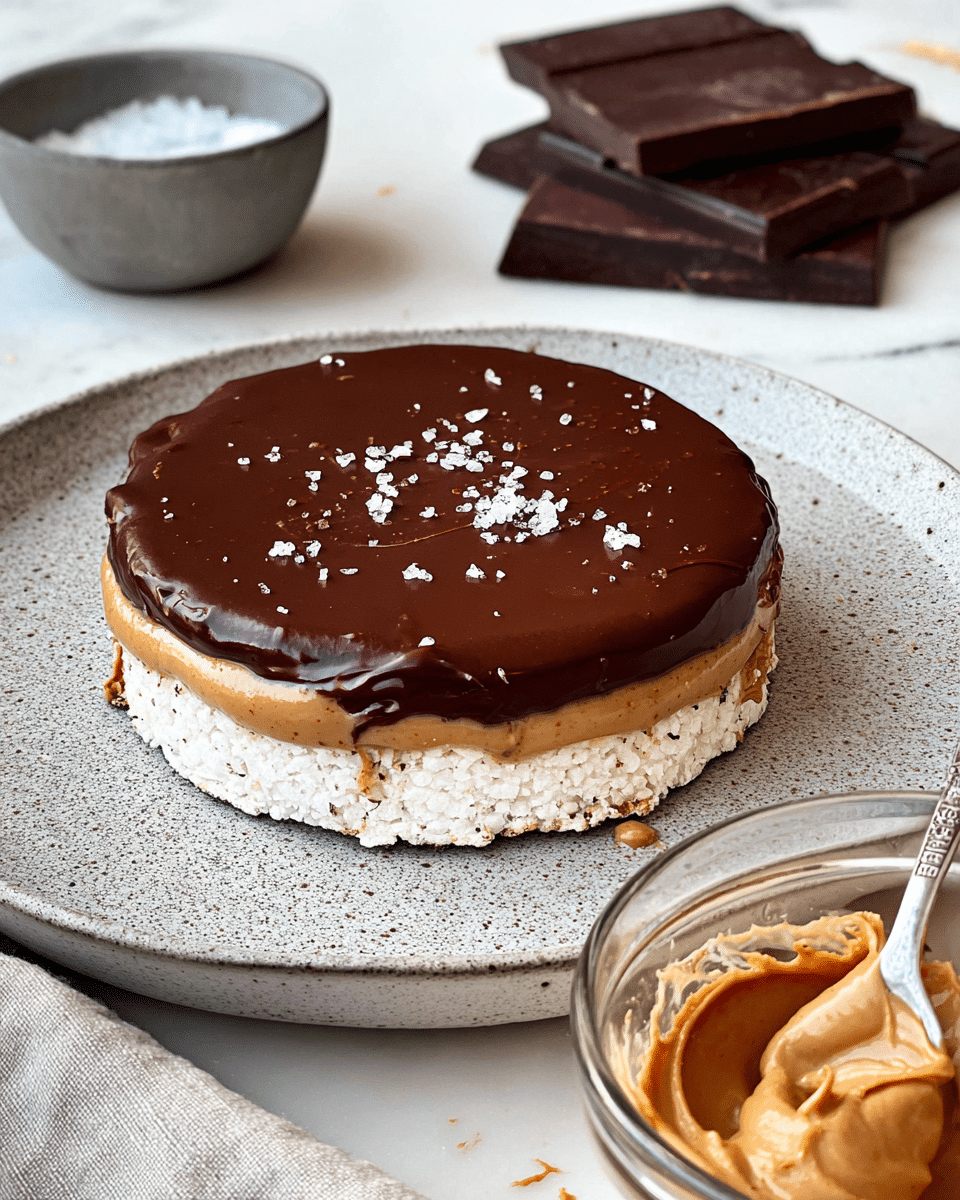
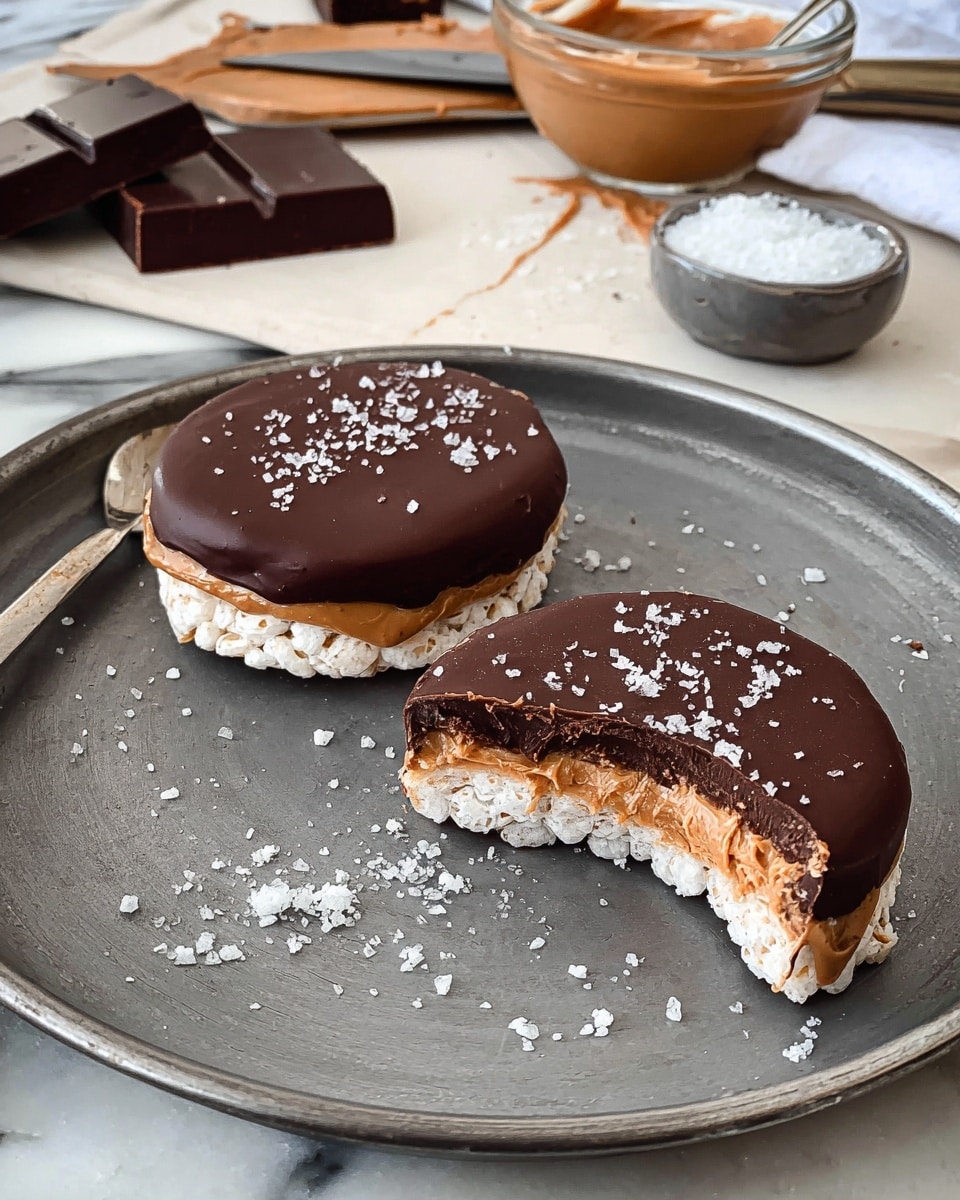
This Giant Peanut Butter Cup Rice Cake is a deliciously simple treat that combines the rich flavors of dark chocolate and creamy peanut butter on a crunchy rice cake. It’s quick to make and perfect for satisfying your sweet tooth without the guilt.
Ingredients
- 1-2 tablespoons (½ ounce – 1 ounce) dark chocolate (60% or 72% cacao recommended)
- ¼ teaspoon coconut oil (optional)
- 1-2 tablespoons peanut butter
- 1 plain whole grain rice cake
- Pinch of sea salt (optional)
Instructions
- Step 1: Place the dark chocolate and coconut oil (if using) in a microwave-safe bowl. Microwave in 30-second increments, stirring well after each interval, until the chocolate is completely melted and smooth.
- Step 2: Spread the peanut butter evenly over the entire surface of the rice cake. Pour the melted chocolate on top of the peanut butter and spread it out gently with a spoon to cover the layer completely. Sprinkle a pinch of sea salt over the top if desired.
- Step 3: Place the prepared rice cake in the freezer for 10-20 minutes until the chocolate sets and becomes firm. Once ready, enjoy your giant peanut butter cup rice cake!
Tips & Variations
- Use crunchy peanut butter for extra texture or swap peanut butter for almond butter or another nut butter for a different flavor.
- If you don’t have coconut oil, you can omit it; the chocolate will still melt well but may be slightly less glossy.
- For more indulgence, sprinkle crushed nuts or a few mini chocolate chips on top before freezing.
Storage
Store leftover rice cakes in an airtight container in the refrigerator to keep the chocolate firm. They are best enjoyed within 2-3 days. To soften before eating, let them sit at room temperature for a few minutes or microwave very briefly.
How to Serve
Serve this delicious recipe with your favorite sides.
FAQs
Can I use milk chocolate instead of dark chocolate?
Yes, milk chocolate can be used, but the treat will be sweeter and less intense in flavor. Adjust peanut butter quantity accordingly to balance sweetness.
Is it necessary to freeze the rice cake?
Freezing helps the chocolate to set quickly and keeps the treat crisp. You can refrigerate it instead, but it may take longer for the chocolate to harden.
PrintGiant Peanut Butter Cup Rice Cake Recipe

This Giant Peanut Butter Cup Rice Cake is a quick and delicious snack combining the creamy richness of peanut butter with the bold flavor of dark chocolate atop a crunchy whole grain rice cake. Perfect for satisfying sweet cravings with a wholesome twist, this treat is easy to make and requires minimal ingredients and time.
- Prep Time: 5 minutes
- Cook Time: 2 minutes
- Total Time: 25 minutes
- Yield: 1 serving 1x
- Category: Snack
- Method: No-Cook
- Cuisine: American
- Diet: Vegetarian
Ingredients
Chocolate Layer
- 1–2 tablespoons (½ ounce – 1 ounce) dark chocolate (60% or 72% cacao)
- ¼ teaspoon coconut oil (optional)
Base and Toppings
- 1–2 tablespoons peanut butter
- 1 plain whole grain rice cake
- Pinch of sea salt (optional)
Instructions
- Melt the Chocolate: Place the dark chocolate and coconut oil (if using) in a microwave-safe bowl. Microwave in 30-second increments, stirring well after each, until the chocolate is completely melted and smooth, ensuring no lumps remain.
- Assemble the Rice Cake: Spread peanut butter evenly over the entire surface of the plain whole grain rice cake, creating a thick and even layer for maximum flavor in every bite.
- Add the Chocolate Layer: Pour the melted dark chocolate over the peanut butter-covered rice cake. Use a spoon to spread the chocolate evenly, covering the peanut butter layer completely. Sprinkle a pinch of sea salt on top to enhance the flavors, if desired.
- Set the Treat: Place the assembled rice cake in the freezer for 10 to 20 minutes, allowing the chocolate to firm up and harden, creating a perfect texture reminiscent of a peanut butter cup.
- Serve and Enjoy: Once firm, remove from the freezer and enjoy immediately as a satisfying and indulgent snack.
Notes
- Using dark chocolate with 60% or higher cacao provides a rich flavor and less sugar.
- Coconut oil is optional but helps create a smoother, shinier chocolate layer.
- Freezing the rice cake helps the chocolate set quickly and creates a refreshing texture.
- Adjust the amount of peanut butter and chocolate to your taste preference.
- For an extra crunch, you can use a rice cake with added seeds or nuts.
Keywords: Peanut Butter Cup, Rice Cake Snack, Dark Chocolate, Quick Snack, Healthy Dessert, Vegetarian Snack


