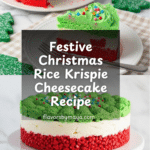
Christmas Rice Krispie Cheesecake Recipe
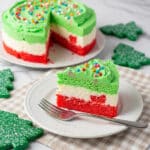
Celebrate the holidays with this vibrant Christmas Rice Krispie Cheesecake featuring festive red and green layers of buttery marshmallow-coated Rice Krispies and a creamy, rich cheesecake center. Perfectly sweet and textured, this no-bake holiday treat combines the fun crunch of a classic rice cereal with a luscious cheesecake filling and sparkling sprinkles for a show-stopping dessert.
- Prep Time: 25 minutes
- Cook Time: 15 minutes
- Total Time: 4 hours 40 minutes
- Yield: 12 servings 1x
- Category: Dessert
- Method: No-Cook
- Cuisine: American
Ingredients
Scale
Red Krispie Layer
- 1 1/2 Tbsp Butter
- 21 large Marshmallows
- 3 cups Rice Krispies Cereal
- Christmas Red Food Coloring Gel (several drops)
Cheesecake Filling
- 1/2 cup Heavy Whipping Cream
- 1 cup Sugar
- 1 tsp Vanilla Extract
- 2 (8 oz) packages Cream Cheese, softened
Green Krispie Layer
- 1 1/2 Tbsp Butter
- 22 large Marshmallows
- 3 cups Rice Krispies Cereal
- Christmas Green Food Coloring Gel (several drops)
Decoration
- Nonpareils (assorted colors or Christmas mix), as desired
Instructions
- Prepare pan: Cut parchment paper to fit the bottom of a spring-form pan and line it, set aside for later use.
- Make red Krispie layer: In a heavy-bottomed saucepan, melt 1 1/2 tablespoons of butter over medium-high heat. Add 21 marshmallows and stir to coat them in butter. Reduce heat to low and melt the marshmallows completely, stirring frequently. Add several drops of red food coloring gel until you achieve a bright, festive red color. Stir well.
- Add cereal to red mixture: Measure 3 cups Rice Krispies cereal and add to the melted marshmallow mixture. Stir thoroughly until cereal is evenly coated.
- Form red crust: Press the red Krispie mixture evenly into the bottom of the prepared spring-form pan using a large spatula, making sure it reaches the edges. Place pan in the freezer to set.
- Prepare cheesecake filling: In a stand mixer bowl, whip the heavy cream until stiff peaks form. Turn off mixer, then add sugar, vanilla extract, and softened cream cheese. Mix until smooth, thick, and creamy.
- Layer cheesecake filling: Remove spring-form pan from freezer and pour cheesecake mixture over the red Krispie crust, spreading evenly. Return to freezer and chill for at least 4 hours until firm.
- Make green Krispie layer: In a clean heavy-bottomed saucepan, melt the remaining 1 1/2 tablespoons butter over medium-high heat. Add 22 marshmallows and stir to coat. Reduce heat to low and melt marshmallows completely. Mix in several drops of green food coloring gel until a bright green hue is achieved. Stir well.
- Add cereal to green mixture: Measure 3 cups Rice Krispies cereal, add to the melted green marshmallow mixture, and stir until fully coated.
- Top cheesecake with green layer: Spoon or pour the green Krispie mixture over the chilled cheesecake layer. Spread evenly with a large spatula, covering to the edges, filling the pan to the top.
- Decorate and freeze: Generously sprinkle with nonpareils or Christmas-themed sprinkles. Place pan back in the freezer and leave overnight for best results.
- Prepare to serve: About 15 minutes before serving, remove cheesecake from freezer. Remove the spring-form pan rim. Use a large sharp knife warmed under hot water and dried to cut the cheesecake into 2 to 3 inch pieces for clean slices.
- Serve: Place slices on dessert plates and enjoy the festive, creamy, crunchy Christmas treat.
Notes
- Use heavy-bottomed saucepans to prevent marshmallows from burning during melting.
- Press Krispie layers firmly in pan to ensure they hold together well.
- Allow cheesecake to chill long enough in freezer so it is firm and slices cleanly.
- Warm knife before cutting to prevent cracking or crumbling of layers.
- Nonpareils or sprinkles add a festive touch but can be substituted with crushed candy canes for a minty flavor.
- Handle the coloring gels carefully; add little at a time until desired color intensity is reached.
- Make sure cream cheese is fully softened for easiest mixing and smooth texture.
Keywords: Christmas dessert, Rice Krispie treat, Cheesecake, Holiday recipe, No-bake cheesecake, Festive dessert, Holiday sweets