Chocolate Christmas Candy Recipe
Introduction
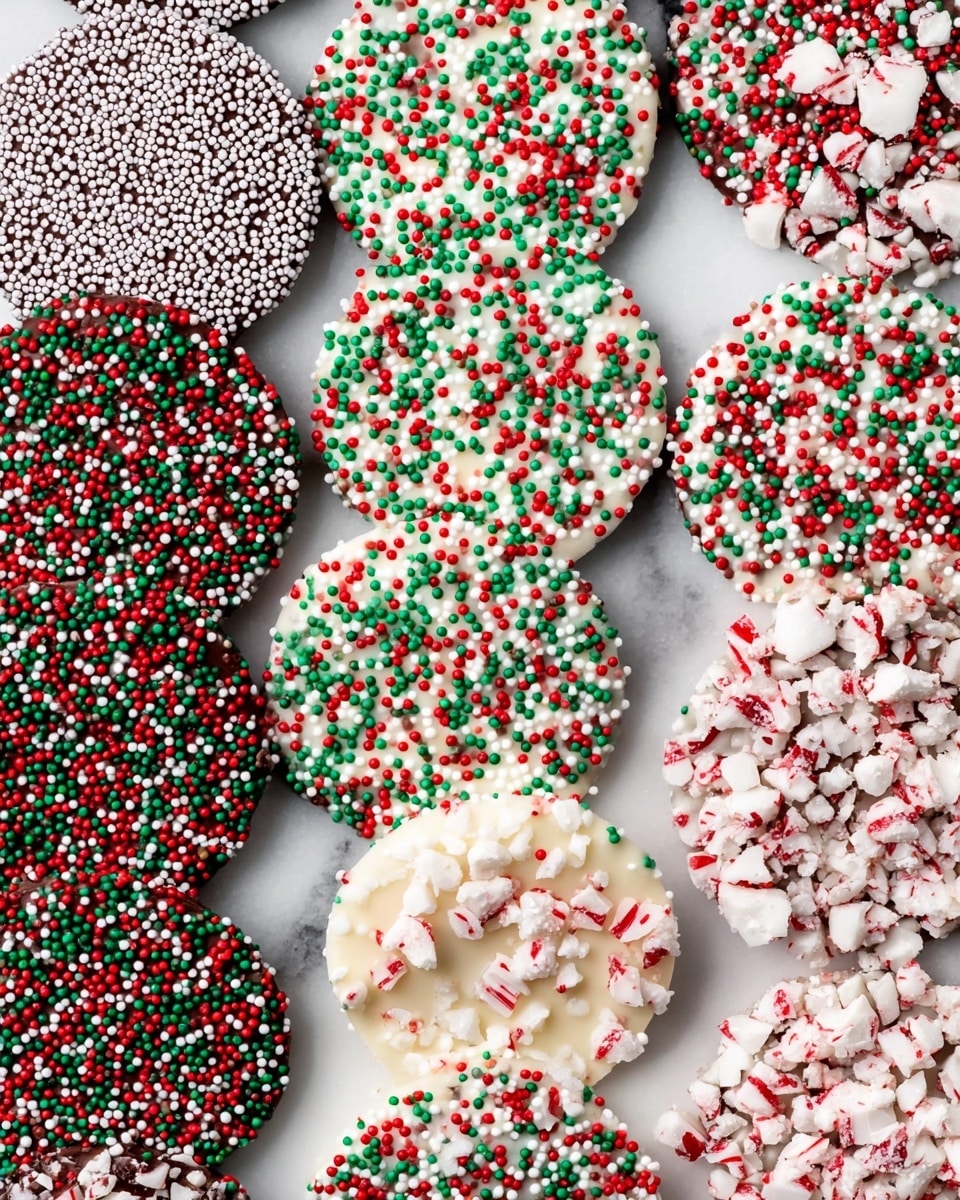
Chocolate Christmas Candy is a festive and fun treat that’s perfect for the holiday season. Combining smooth melting chocolates with colorful sprinkles and crushed candy canes, these bite-sized sweets are both beautiful and delicious. They make excellent gifts or party favors that everyone will love.

Ingredients
- 2 cups semi-sweet melting chocolates
- 2 cups white chocolate melting wafers
- ½ cup white non-pareil sprinkles
- ½ cup red, green, and white non-pareil sprinkles
- ½ cup crushed candy canes
Instructions
- Step 1: Prepare the sprinkles by arranging the white non-pareil sprinkles, the mixed red, green, and white non-pareil sprinkles, and the crushed candy canes into three separate rows about ¼ inch deep. Use a serving dish with high edges or three separate plates for easier handling.
- Step 2: Melt one type of chocolate in a microwave-safe bowl according to the package instructions. Melt only one chocolate at a time to avoid needing to remelt, as the chocolate hardens quickly.
- Step 3: Transfer the melted chocolate into a piping bag or a zip lock bag with a small hole cut in the corner. Pipe small circles about ½ inch in diameter directly over the sprinkles, repeating until the chocolate or half of the sprinkles are used.
- Step 4: Let the chocolate pieces sit on the sprinkles for about 5 minutes until hardened. To speed up the process, place them in the refrigerator for a minute. Once set, use a fork to carefully scoop the candies out of the sprinkles.
- Step 5: Repeat the melting and piping process with the remaining chocolate and sprinkles following the same steps.
- Step 6: Once all candies are formed and hardened, place them into a bowl, mason jar, or gift bag. They are ready to serve immediately or give as gifts.
Tips & Variations
- For a festive twist, try using peppermint or mint-flavored melting chocolates to complement the crushed candy canes.
- If you don’t have sprinkles, finely chopped nuts or crushed cookies make great alternatives for added texture.
- To avoid chocolate clumps, stir gently while melting and avoid overheating the chocolate.
Storage
Store the finished candies in an airtight container at room temperature for up to two weeks. For longer storage or warmer climates, keep them refrigerated and bring to room temperature before serving. They can be gently reheated by placing them in a warm area or briefly in the microwave on low power if they lose their shine.
How to Serve
Serve this delicious recipe with your favorite sides.
FAQs
Can I use regular chocolate instead of melting wafers?
It’s best to use melting chocolates or wafers as they melt smoothly and harden with a glossy finish. Regular chocolate can be used but may require tempering for the best texture and appearance.
How do I prevent the chocolate from melting too fast when working?
Work quickly after melting and only melt one type of chocolate at a time. Keep any unmelted chocolate at room temperature and avoid overheating, as repeated heating causes clumping.
PrintChocolate Christmas Candy Recipe

These delightful Chocolate Christmas Candies are festive treats made by melting semi-sweet and white chocolate wafers and decorating them with colorful sprinkles and crushed candy canes. Perfect for holiday celebrations, these candies are easy to make, require no baking, and can be gifted or enjoyed immediately.
- Prep Time: 10 minutes
- Cook Time: 5 minutes (melting and setting per chocolate batch)
- Total Time: 20 minutes
- Yield: 40–50 candies 1x
- Category: Candy
- Method: No-Cook
- Cuisine: American
Ingredients
Chocolate
- 2 cups semi-sweet melting chocolates
- 2 cups white chocolate melting wafers
Decorations
- ½ cup white non-pareil sprinkles
- ½ cup red, green, and white non-pareil sprinkles
- ½ cup crushed candy canes
Instructions
- Prepare the sprinkles. Arrange your white non-pareil sprinkles, red/green/white non-pareil sprinkles, and crushed candy canes in three separate rows about a quarter inch deep. It is easiest to use a serving dish with high edges or three separate plates to keep the sprinkles organized and accessible.
- Melt the chocolate. In a microwave-safe bowl, melt one type of chocolate (semi-sweet or white) following the package instructions carefully. Melt only one type at a time to avoid re-melting and hardening issues.
- Make the candy. Transfer the melted chocolate to a piping bag or a resealable plastic bag with a small hole cut in the tip. Pipe small circles approximately half an inch in diameter directly over the sprinkles, covering the area evenly until you have used all the chocolate or half of the sprinkles.
- Remove the candy. Let the chocolate set on top of the sprinkles for about 5 minutes until hardened. To speed this up, place the candies briefly in the refrigerator. Once hardened, gently lift the candies from the sprinkles using a fork to avoid breaking them.
- Repeat. Repeat the melting, piping, and setting process with the remaining chocolate type, following the same steps for a colorful variety.
- Finish. Place your finished candies into a bowl, mason jar, or gift bag for serving or gifting. These candies can be enjoyed immediately or given as festive holiday treats.
Notes
- Use a microwave-safe bowl for melting the chocolates and heat in short intervals to avoid burning.
- Work quickly as melted chocolate can harden fast once removed from heat.
- For easier candy removal, chill the candies for a minute in the refrigerator after piping.
- This recipe yields about 40-50 small candies depending on size piped.
- Store finished candies in an airtight container at room temperature for up to two weeks.
- Feel free to customize sprinkles and decorations to match other holiday themes.
Keywords: Chocolate candy, Christmas candy, holiday treats, no-bake chocolate, festive candy, melted chocolate sprinkles


