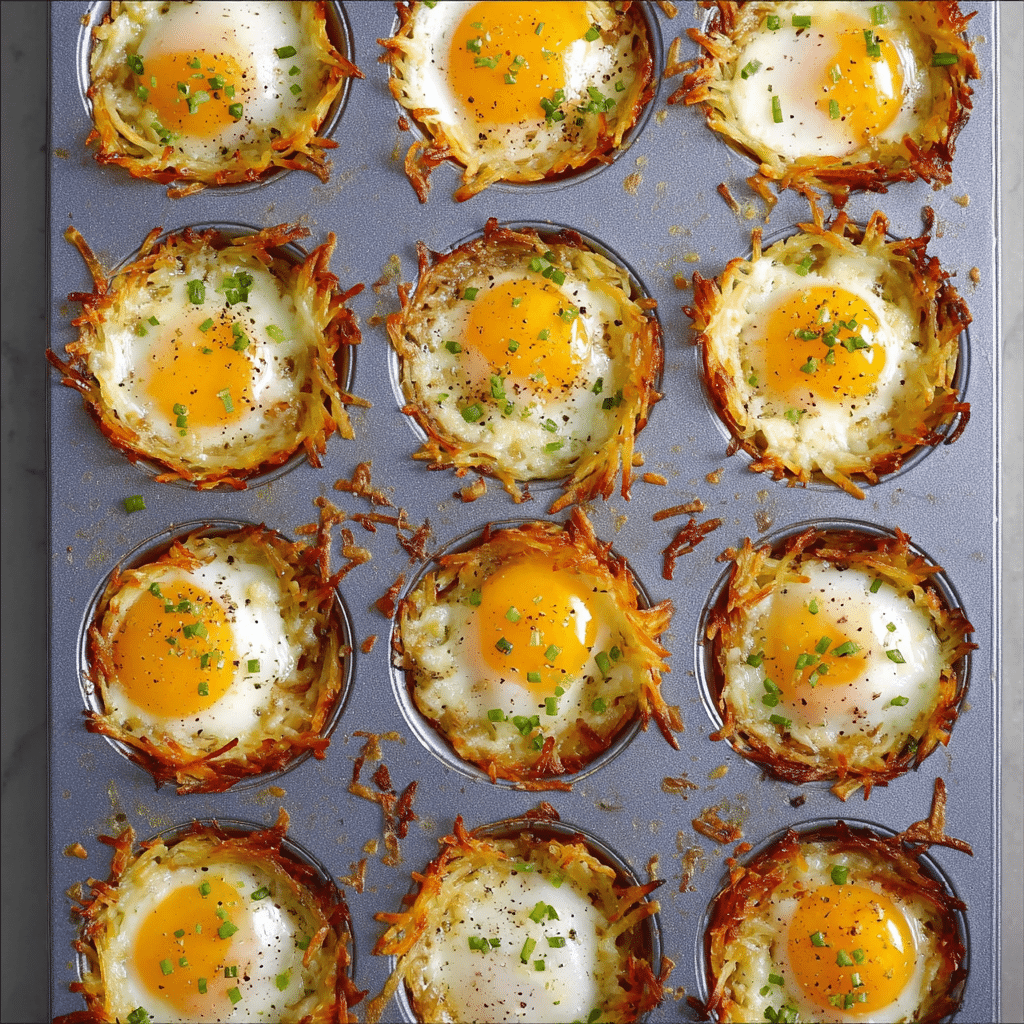
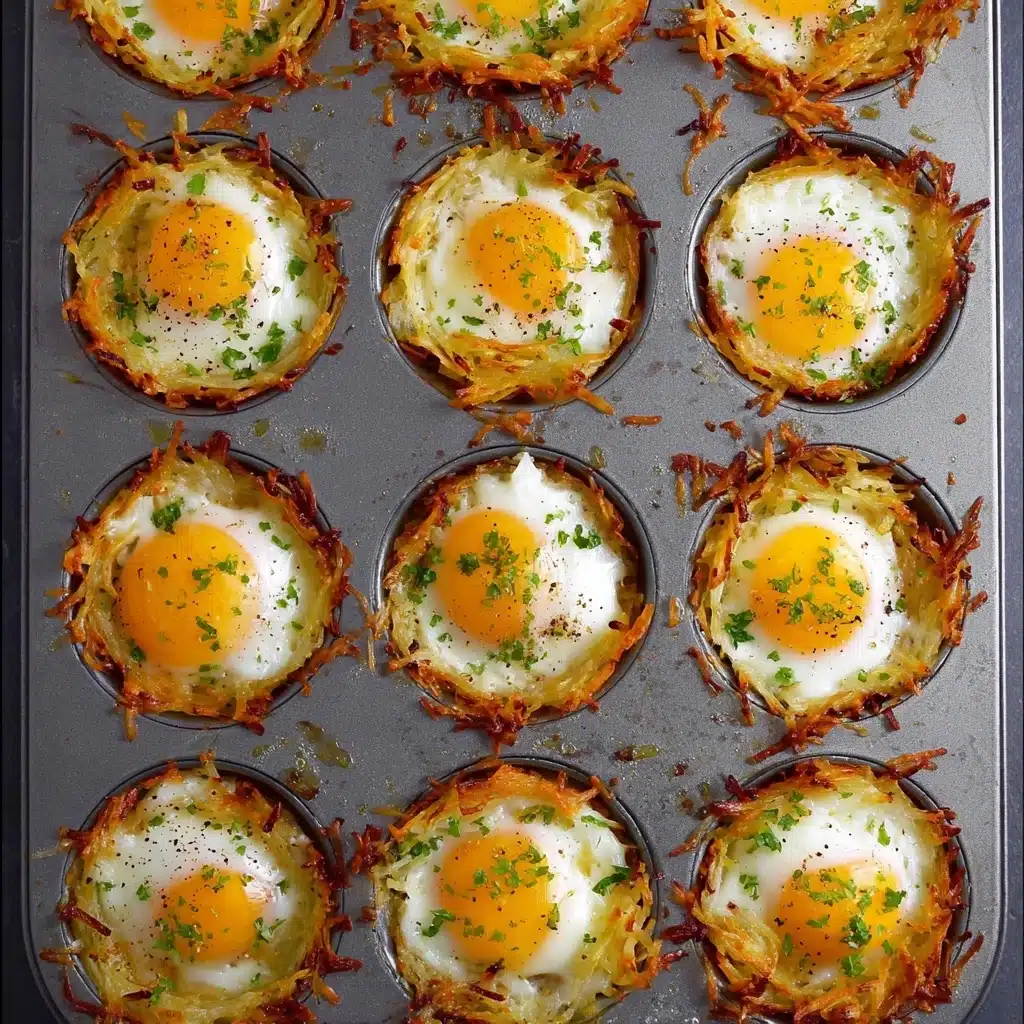
Cheesy Hash Brown Cups with Baked Eggs Recipe
If you’re looking to impress at brunch or simply treat yourself to a comforting, savory breakfast, these Cheesy Hash Brown Cups with Baked Eggs are an absolute game-changer. Crispy, golden hash browns are transformed into little edible bowls brimming with rich, melty cheddar and perfectly baked eggs nestled right inside. Each bite offers a delightful combination of textures and flavors that feels both indulgent and wholesome. This recipe is straightforward enough for everyday cooking yet special enough to serve guests, making it one of my all-time favorite breakfast dishes to share with friends and family.
Ingredients You’ll Need
To create these delicious Cheesy Hash Brown Cups with Baked Eggs, you’ll rely on a handful of simple, fresh ingredients. Each one plays a key role in balancing taste, texture, and color, turning everyday pantry staples into something truly crave-worthy.
- Refrigerated hash browns: Using pre-shredded potatoes saves time and ensures consistent texture for crispy edges and tender middles.
- Shredded cheddar cheese: Sharp cheddar adds creamy, cheesy richness and melts beautifully inside the cup.
- Unsalted butter: Melted butter enhances flavor and helps crisp the hash browns perfectly without overwhelming saltiness.
- Large eggs: Whole eggs provide a delicate, silky center that bakes right inside the crispy potato cups.
- Chopped fresh chives: A fresh, mild onion note that adds brightness and a pop of green for garnish.
How to Make Cheesy Hash Brown Cups with Baked Eggs
Step 1: Prep Your Oven and Muffin Tin
Start by preheating your oven to 400°F. This ensures a hot environment for crisping the hash browns quickly. Grease your muffin tin thoroughly with cooking spray or melted butter—it’s important to prevent sticking and to help the hash brown cups release easily later.
Step 2: Mix the Hash Browns, Cheese, and Butter
In a medium bowl, combine the refrigerated hash browns with shredded cheddar cheese and melted butter. The butter coats each shredded potato strand, helping everything crisp and bake evenly, while the cheese starts to meld deliciousness right from the start.
Step 3: Form the Hash Brown Cups
Divide the cheesy hash brown mixture evenly among the 12 muffin cups, pressing the potatoes firmly into the bottoms and all the way up the sides. The mixture will look very full, but as it bakes, it will shrink slightly and crisp up to form sturdy cups ready to hold the eggs.
Step 4: Bake the Hash Brown Cups
Bake the cups for 25 minutes. Then, remove them from the oven and gently press down the center of each cup with a dry measuring cup or spoon to create space for the egg. This step ensures each baked egg sits perfectly in its crispy potato nest.
Step 5: Add the Eggs
Crack one egg into the center of each hash brown cup. Season each egg with a sprinkle of salt and pepper to bring out the rich egg flavor as it bakes.
Step 6: Bake Again Until Eggs Are Done
Return the muffin tin to the oven and bake for an additional 12 to 15 minutes, depending on how runny or firm you prefer your eggs. Keep an eye on them—this last baking step gently cooks the eggs while maintaining the crispy texture of the hash browns.
Step 7: Cool and Serve
Once baked to perfection, remove the cups and let them cool in the pan for at least 10 minutes. This resting time helps the cups set and makes for easier removal. Run a sharp knife around each edge to loosen and release from the tin. Finish by sprinkling chopped fresh chives over the top for a burst of color and light onion flavor.
How to Serve Cheesy Hash Brown Cups with Baked Eggs
Garnishes
Freshly chopped chives are the go-to garnish here, adding a mild, oniony brightness that complements both the egg yolk and cheesy potatoes. You can also sprinkle a bit of smoked paprika or cracked black pepper for an extra kick if you like.
Side Dishes
These cups shine on their own but pair beautifully with fresh fruit salad, crispy bacon strips, or lightly dressed mixed greens for a balanced meal. A dollop of sour cream or a drizzle of hot sauce also makes a lovely accompaniment.
Creative Ways to Present
Serve these Cheesy Hash Brown Cups with Baked Eggs on a rustic wooden board surrounded by colorful veggies or sliced avocado for a vibrant brunch spread. For parties, arrange them on a tiered tray to impress guests with eye-catching layers of cheesy goodness and golden eggs gleaming on top.
Make Ahead and Storage
Storing Leftovers
If you have leftovers, store them in an airtight container in the refrigerator for up to 3 days. The crispy texture softens a bit overnight but reheats wonderfully.
Freezing
While freezing is possible, the texture is best fresh. To freeze, wrap each cup individually in plastic wrap, then place in a freezer-safe bag for up to one month. Thaw overnight in the fridge before reheating.
Reheating
To bring the crispy texture back, reheat the hash brown cups in a 350°F oven for 10 to 15 minutes or until hot and slightly crisp. Microwaving works but will result in softer edges instead of crispness.
FAQs
Can I use frozen hash browns instead of refrigerated ones?
Yes, you can, but be sure to thaw and drain them well to avoid excess moisture that can make the cups soggy.
How do I know when the eggs are perfectly baked?
Check the whites—the egg is done when they’re set and opaque. The yolk don’t have to be fully firm unless you prefer them that way.
Can I add other cheeses instead of cheddar?
Definitely! Try gouda, mozzarella, or pepper jack for different flavors. Just make sure it melts well to keep that gooey texture.
Are these suitable for meal prepping?
Absolutely. They keep well in the fridge and can be quickly reheated, making for a convenient and tasty breakfast option.
Can I make these without butter?
You can substitute butter with olive oil, but butter offers the best flavor and crispiness for this recipe.
Final Thoughts
These Cheesy Hash Brown Cups with Baked Eggs have become a beloved staple in my kitchen because they are simple, satisfying, and absolutely delicious. Whether for a weekend brunch or a special breakfast treat, this recipe brings cozy, cheesy goodness and baked egg perfection together in every bite. I can’t wait for you to try it and make it your own favorite too!
PrintCheesy Hash Brown Cups with Baked Eggs Recipe

Cheesy Hash Brown Cups with Baked Eggs are a delightful breakfast treat featuring crispy hash browns mixed with melted butter and cheddar cheese, baked into muffin tins to form cups that hold perfectly baked eggs. Topped with fresh chives, these individual portions are easy to prepare, flavorful, and make a great start to any morning.
- Prep Time: 10 minutes
- Cook Time: 40 minutes
- Total Time: 50 minutes
- Yield: 12 servings 1x
- Category: Breakfast
- Method: Baking
- Cuisine: American
- Diet: Gluten Free
Ingredients
Hash Brown Mixture
- 1 (20-oz.) package refrigerated hash browns
- 2/3 cup shredded cheddar cheese
- 5 tablespoons unsalted butter, melted
Eggs
- 12 large eggs
Garnish
- Chopped fresh chives, for serving
- Salt, to taste
- Black pepper, to taste
Instructions
- Prepare the Oven and Muffin Tin: Preheat your oven to 400°F (204°C). Grease a 12-cup muffin tin thoroughly with cooking spray or melted butter to prevent sticking.
- Mix Hash Brown Ingredients: In a medium mixing bowl, combine the refrigerated hash browns, shredded cheddar cheese, and melted unsalted butter. Stir until all ingredients are evenly mixed.
- Form the Hash Brown Cups: Evenly divide the hash brown mixture among the 12 muffin cups, filling each cup fully. Press the mixture firmly against the bottom and up the sides of each muffin cup to form a cup shape. Expect fullness as they will shrink while baking.
- Bake the Cups: Place the muffin tin in the oven and bake for 25 minutes to allow the hash browns to become crispy and hold their shape.
- Create Space for Eggs: Remove the muffin tin from the oven. Using a dry measuring cup or spoon, gently press down the centers of each hash brown cup to create room for the eggs.
- Add Eggs and Season: Crack one large egg into the center of each hash brown cup. Sprinkle salt and freshly ground black pepper on top of each egg to taste.
- Bake Again: Return the muffin tin to the oven and bake for an additional 12 to 15 minutes, or until the eggs reach your preferred level of doneness, whether that is runny or fully set yolks.
- Cool and Serve: Remove the hash brown cups from the oven and allow them to cool in the muffin tin for at least 10 minutes. This resting time helps them firm up. Run a sharp knife around the edges to loosen each cup, then carefully remove them. Garnish with chopped fresh chives before serving.
Notes
- For crispier hash brown cups, use a light coating of cooking spray rather than butter when greasing the muffin tin.
- You can customize the cheese by using a blend or substituting with mozzarella or Monterey Jack for different flavors.
- To make this recipe gluten-free, ensure your refrigerated hash browns contain no gluten additives.
- Leftovers can be refrigerated and reheated in the oven or microwave, though best enjoyed fresh for crispiness.
- Adjust baking time for eggs depending on your preferred yolk consistency: less time for runny yolks, more time for firm yolks.
Nutrition
- Serving Size: 1 hash brown cup with egg
- Calories: 210 kcal
- Sugar: 0.5 g
- Sodium: 270 mg
- Fat: 14 g
- Saturated Fat: 7 g
- Unsaturated Fat: 6 g
- Trans Fat: 0 g
- Carbohydrates: 14 g
- Fiber: 1.5 g
- Protein: 10 g
- Cholesterol: 185 mg
Keywords: cheesy hash brown cups, baked eggs, breakfast recipe, easy egg cups, hash brown muffins


