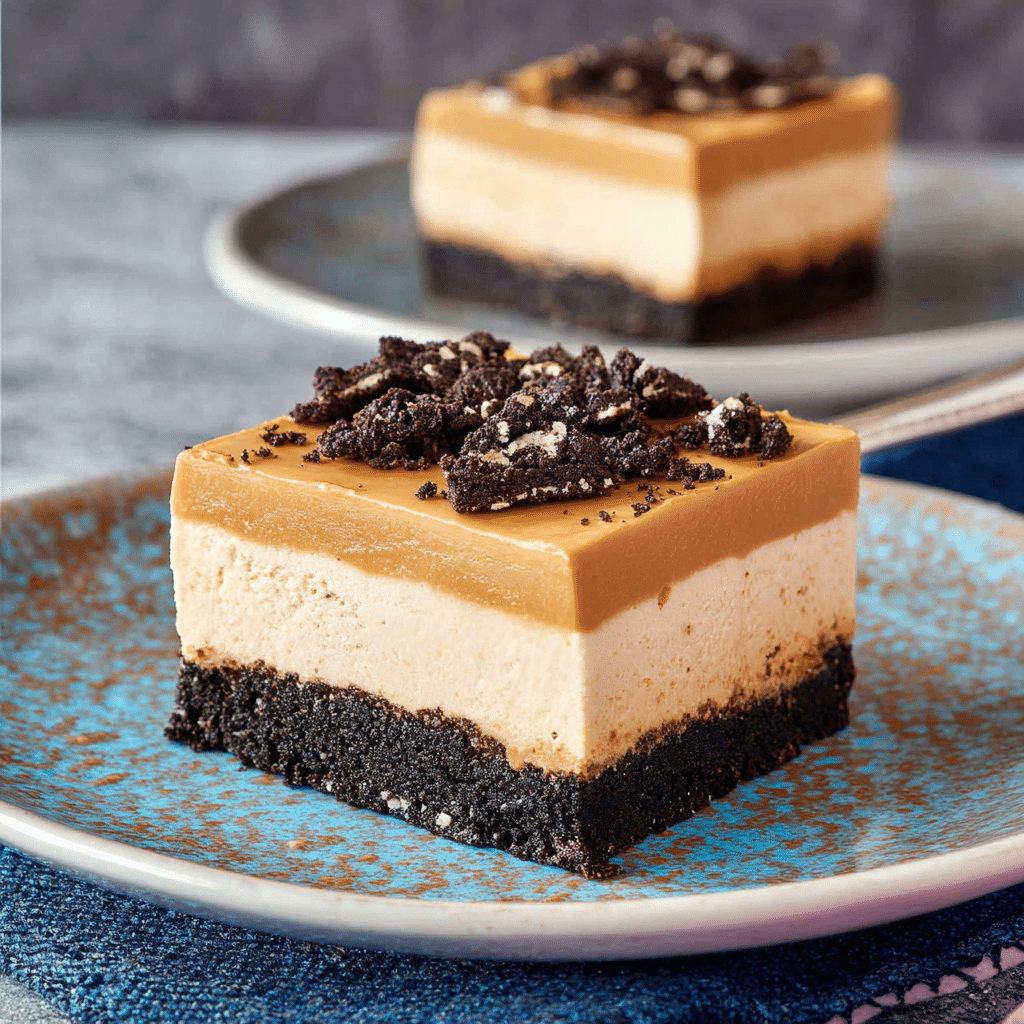
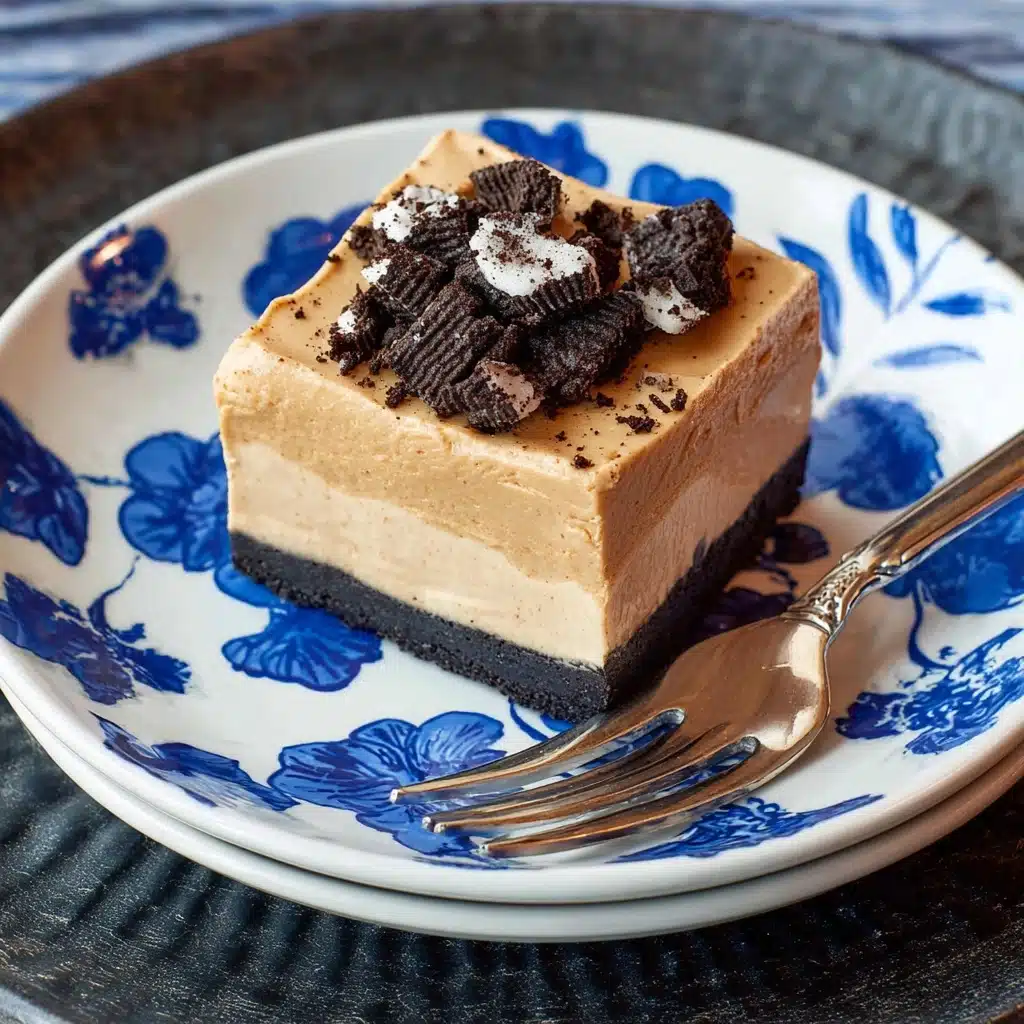
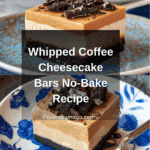
Whipped Coffee Cheesecake (No-Bake) Recipe
If you’re captivated by the duo of creamy cheesecake and the magical foaminess of dalgona, this Whipped Coffee Cheesecake (No-Bake) brings the best of both worlds to your dessert table. Imagine an ultra-silky coffee-kissed cheesecake nestled atop a robust Oreo crust, all crowned with a lush, cloudlike layer of whipped coffee. There’s a hint of tang, a punch of espresso, and not a water bath or oven stress in sight. With each bite, you get layers of bold flavor and impressive presentation—this dessert was made for wowing friends, but it’s just as good when you sneak an extra square for yourself.
Ingredients You’ll Need
The ingredients for Whipped Coffee Cheesecake (No-Bake) are pantry staples with a few irresistible twists. Each plays its part in building striking flavors, cloudlike textures, or dramatic color contrast for a truly memorable treat.
- Oreo Thins cookies (35, cream and all): These set the stage with a thinner, crispier chocolatey base that balances the creamy flavors above.
- Unsalted butter (2 1/2 oz, 5 tbsp): It binds the crust and delivers a melt-in-your-mouth richness with every bite.
- Instant coffee crystals (for crust & filling): Deepens the mocha vibes and boosts that grown-up edge.
- Heavy pinch of salt: Adds sharpness to keep the sweetness in check.
- Cream cheese (2 blocks, softened): The backbone of any cheesecake, offering a pillowy, luscious mouthfeel.
- Powdered sugar (1 cup): Blends smoothly into the filling for gentle sweetness with no gritty texture.
- Greek yogurt (1/4 cup): Adds tang and structure to mimic classic cheesecake’s subtle bite.
- Vanilla extract (2 tsp): Rounds out the flavors with aromatic warmth.
- Salt (1/4 tsp in filling): Brings out the nuanced flavors in the creamy layer.
- Heavy cream (for filling, coffee layer, and topping): Whips up into clouds for both lift and a luxurious mouthfeel.
- Granulated sugar (for whipping and coffee foam): Provides body for the whipped components and a sparkling finish.
- Hot water (for whipped coffee): Melts the coffee and sugar for an ultra-foamy top layer.
- Vanilla extract (1/2 tsp in topping): Perfumes the finishing cream with a final hint of sweetness.
How to Make Whipped Coffee Cheesecake (No-Bake)
Step 1: Prepare the Pan
Start by lining your 9-inch square baking pan with two long strips of parchment or non-stick foil, criss-crossing them so the edges hang over the sides. This trick ensures your bars come out easily and beautifully neat, no wrestling required.
Step 2: Make the Crust
Grab your food processor and pulse all of the Oreo Thins (cream and all!) into fine crumbs. If you don’t have a processor, a sturdy zip-top bag and rolling pin will do the job with a bit more elbow grease. Add the cold butter cubes, a teaspoon of instant coffee crystals, and a good pinch of salt, then pulse until everything looks like wet sand. Press this mixture firmly into your lined pan for a tight, compact base—really press down, so it won’t crumble later. Bake at 350°F for 12 minutes, then cool. If you prefer a true no-bake method, just freeze it while you prepare the filling, but you’ll love the depth a baked crust adds!
Step 3: Mix the Cream Cheese Layer
Using a stand mixer or handheld beaters, blend your softened cream cheese, powdered sugar, Greek yogurt, vanilla, and salt until creamy, ultra-smooth, and uniform in color. Dissolve a tablespoon of instant coffee in a tablespoon of heavy cream (a quick zap in the microwave helps). Stir until the coffee is fully dissolved, then beat it in. Make sure your mixture is airy and streak-free—this sets the tone for the rest of the dish.
Step 4: Fold in the Whipped Cream
In a clean bowl, whip one cup of heavy cream with two tablespoons of granulated sugar to medium-stiff peaks. You want the cream just holding its shape, with soft tops that slightly fold over. Gently fold this fluffy cream into your coffee-cheese mixture until fully blended—take your time here for the lightest, dreamiest texture.
Step 5: Assemble and Chill the Cheesecake
Spoon the creamy mixture onto your cooled or chilled crust. Use an offset spatula or the back of a spoon to get into every corner and create a perfectly even layer. Cover tightly with plastic wrap or foil and chill overnight, giving the cheesecake time to set up so each layer is sliceable and rich.
Step 6: Whip Up the Coffee Topping
Now for that signature dalgona flourish! Combine three tablespoons each of instant coffee crystals, granulated sugar, and hot water in a mixing bowl. Use a hand mixer or coffee frother to whip until fluffy, pillowy, and at least quadrupled in volume—don’t skimp on this step, since the foam is pure drama. Separately, whip three-quarters cup cream with one-quarter cup sugar and a splash of vanilla extract to medium peaks. Finally, gently whisk in the whipped coffee foam and beat just until the peaks hold.
Step 7: Finish and Chill Again
Spread the whipped coffee cloud in a thick, even layer over the cheesecake. A gentle hand with an offset spatula makes for beautiful swoops. Pop the pan back in the fridge for at least an hour before serving so everything is extra set and easy to cut.
How to Serve Whipped Coffee Cheesecake (No-Bake)
Garnishes
For an elegant finish, dust the top with a little cocoa powder, sprinkle on some finely crushed Oreo crumbs, or add chocolate shavings. A handful of chocolate-covered coffee beans or a light drizzle of caramel makes the colors and coffee notes pop even more. Presentation is half the fun with Whipped Coffee Cheesecake (No-Bake)!
Side Dishes
This cheesecake truly stands alone, but a small bowl of fresh berries provides a bright, tart contrast. For coffee lovers, serve with espresso or a creamy iced latte. If you want to lean into dessert hour, offer biscotti, amaretti cookies, or a small scoop of coffee gelato alongside.
Creative Ways to Present
Cut the cheesecake into sleek squares for elegant parties, or use a biscuit cutter for individual round servings. Layer cubes into glass jars for picnic-perfect parfaits, or garnish with piped dollops of whipped coffee for a bistro-inspired look. Whipped Coffee Cheesecake (No-Bake) dresses up for any occasion!
Make Ahead and Storage
Storing Leftovers
Leftover bars keep well covered in the refrigerator for up to four days. For best texture, store in an airtight container and press a piece of parchment or wax paper directly against the surface, especially if you’re stacking pieces. This helps maintain that luscious topping and stops any fridge aromas from sneaking in.
Freezing
Yes, you can freeze Whipped Coffee Cheesecake (No-Bake)! Once fully assembled and chilled, slice into pieces, then freeze them on a tray before wrapping individually in plastic and storing in a zip-top bag. Freeze for up to 2 months. Thaw overnight in the fridge before serving—the whipped topping may soften slightly but the flavors remain dreamy.
Reheating
This dessert is best served cold or at cool room temperature, so there’s no need for reheating. If you’ve frozen your bars, simply transfer them to the refrigerator to thaw. Avoid microwaving, or you risk melting that showstopping whipped coffee crown.
FAQs
Can I use regular Oreos instead of Oreo Thins?
Yes, regular Oreos will work just fine! The flavor will be a bit richer and the crust slightly thicker. If using classic Oreos, you might want to reduce the butter ever so slightly so the crust doesn’t become too heavy.
Can I make this cheesecake fully no-bake?
Absolutely! If you prefer not to bake the crust, just press it in and pop the pan in the freezer while you prepare the filling. The crust will be slightly softer but still delicious, keeping the whole process oven-free.
What can I substitute for Greek yogurt?
Sour cream is a great swap for Greek yogurt in this recipe; it adds the same creamy tang and rich texture. Just use it in the same quantity.
Can I use decaf instant coffee?
Yes! Decaf instant coffee works perfectly. You’ll keep all the toasty, caramelized coffee flavor and color, but without the caffeine kick—great for late-night indulgences or sharing with caffeine-sensitive friends.
How do I get clean slices when serving?
For gorgeously sharp squares, run your knife under hot water, wipe it dry, and slice with one steady motion. Clean the blade between each cut to keep the layers tidy and distinct. Your Whipped Coffee Cheesecake (No-Bake) will look straight out of a bakery!
Final Thoughts
If you love the drama of dalgona and the richness of cheesecake, this Whipped Coffee Cheesecake (No-Bake) is your next must-try. The layers, the flavor, and the ease of assembly make it irresistibly rewarding. Gather your ingredients, invite your favorite taste testers, and let your kitchen fill with the aroma of something truly special. Your dessert table will never be the same!
PrintWhipped Coffee Cheesecake (No-Bake) Recipe

Indulge in the luscious and creamy delight of a no-bake Whipped Coffee Cheesecake, a perfect fusion of rich coffee flavors and smooth cream cheese, topped with a decadent whipped coffee layer.
- Prep Time: 30 minutes
- Cook Time: 12 minutes
- Total Time: Overnight (plus additional chilling time)
- Yield: 9” square pan 1x
- Category: Dessert
- Method: No-Bake
- Cuisine: American
- Diet: Vegetarian
Ingredients
For the Crust
- 35 Oreo Thins cookies (cream and all)
- 2 1/2 oz (about 5 Tbsp) unsalted butter
- 1 tsp instant coffee crystals
- Heavy pinch of salt
For the Cream Cheese Layer
- 2 blocks cream cheese, softened
- 1 cup powdered sugar
- 1/4 cup Greek yogurt
- 2 tsp vanilla extract
- 1/4 tsp salt
- 1 Tbsp instant coffee crystals
- 1 cup plus 1 Tbsp heavy cream, divided use
- 2 Tbsp granulated sugar
For the Whipped Coffee Layer
- 3 Tbsp instant coffee crystals
- 3 Tbsp granulated sugar
- 3 Tbsp hot water
- 3/4 cup heavy cream
- 1/4 cup granulated sugar
- 1/2 tsp vanilla extract
Instructions
- For the Crust – Line and prepare the baking pan, crush cookies, mix with butter, coffee, and salt, press into pan, bake, and set aside to cool.
- For the Cream Cheese Layer – Cream together cream cheese, powdered sugar, Greek yogurt, vanilla, and salt. Dissolve instant coffee in cream, mix, fold in whipped cream, spread over crust, and refrigerate.
- For the Whipped Coffee Layer – Whip instant coffee, sugar, and water until thick. Whip cream and sugar, fold in whipped coffee, spread over cream cheese layer, and refrigerate before serving.
Notes
- Do not add salt to the whipped coffee layer as it may break down the foam.
Nutrition
- Serving Size: 1 slice
- Calories: 380
- Sugar: 22g
- Sodium: 280mg
- Fat: 29g
- Saturated Fat: 17g
- Unsaturated Fat: 9g
- Trans Fat: 0g
- Carbohydrates: 27g
- Fiber: 1g
- Protein: 5g
- Cholesterol: 85mg
Keywords: Whipped Coffee Cheesecake, No-Bake Cheesecake, Coffee Dessert Recipe
