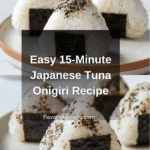
15-min Easy Japanese Tuna Onigiri Recipe
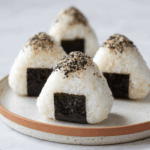
This easy and delicious 15-minute Japanese Tuna Onigiri recipe offers a perfect blend of seasoned short-grain rice with a creamy tuna mayo filling, wrapped in crispy nori seaweed. Ideal for a quick meal or portable snack, these savory rice balls are simple to prepare and customizable to your seaweed preference.
- Prep Time: 5 minutes
- Cook Time: 10 minutes (if cooking rice fresh)
- Total Time: 15 minutes
- Yield: 4 onigiri rice balls 1x
- Category: Snack
- Method: No-cook assembly (assuming rice is pre-cooked); shaping and mixing
- Cuisine: Japanese
- Diet: Halal
Ingredients
Scale
Rice and Seasoning
- 2 cups cooked short grain rice
- 1/2 tsp salt
Tuna Filling
- 5.29 oz canned tuna (in oil recommended, or canned tuna in water)
- 2 tbsp Japanese mayo (or regular mayonnaise)
Assembly & Garnish
- 2 sheets nori (or 1/2 sheet if you prefer less)
- 1 tsp sesame seeds (optional, for garnishing)
Instructions
- Season the Rice: Transfer hot cooked short-grain rice into a large bowl and sprinkle with 1/2 tsp salt. Use a rice paddle to mix carefully and evenly season the rice. Cover and set aside to keep warm. If using leftover cold rice, microwave it for 2-3 minutes before seasoning to soften.
- Prepare Tuna Filling: Open the canned tuna and drain it in a fine sieve, pressing with a fork to remove excess liquid. Transfer the tuna into a small bowl and mix thoroughly with 2 tablespoons of Japanese mayo until well combined. Set aside.
- Prepare Nori Sheets: Decide on your nori preference. For more seaweed, cut 2 nori sheets in half to make 4 rectangular pieces. For less seaweed, use half a sheet cut into 4 equal strips. Set them aside for wrapping later.
- Mold the Rice Base: Fill a bowl with water to wet your hands and prevent sticking. Take about 1/2 cup (100 grams) of cooked rice and place it in your palm. Shape the rice into a round ball and then flatten it into a pancake about 1/2-inch thick. Make a shallow dent in the center to hold the filling. Using tools like an onigiri mold or plastic wrap can help with shaping and reduce stickiness.
- Add Tuna Filling and Shape: Spoon 2 tablespoons (30 ml) of the tuna mayo mixture into the rice dent. Fold the rice over the filling, gently pressing the filling inside as you fold. Firmly pack the mixture into a compact ball, then flatten to about 1.5 inches thick. Shape the rice into a triangle, wetting your hands as needed to keep it smooth and prevent sticking.
- Wrap and Garnish: Wrap one nori piece around the base of the triangular rice ball and press lightly to secure. Repeat the process until you have four onigiri rice balls. Finish by sprinkling sesame seeds on top if desired. Serve immediately and enjoy!
Notes
- When making fresh rice, use short-grain or sushi rice for the best sticky texture suited for onigiri.
- If using leftover rice, warm it to soften before molding to ensure it holds shape.
- You can substitute Japanese mayo with regular mayonnaise but Japanese mayo adds a slight sweetness and umami flavor.
- Adjust nori quantity according to your taste preference for seaweed crunchiness.
- Onigiri molds or plastic wrap make shaping easier and less messy, especially for beginners.
- Consume immediately for best texture, or keep wrapped in plastic wrap to maintain freshness if packing for lunch.
Nutrition
- Serving Size: 1 onigiri (approx. 120g)
- Calories: 220 kcal
- Sugar: 1 g
- Sodium: 350 mg
- Fat: 8 g
- Saturated Fat: 1.5 g
- Unsaturated Fat: 6 g
- Trans Fat: 0 g
- Carbohydrates: 28 g
- Fiber: 1 g
- Protein: 10 g
- Cholesterol: 25 mg
Keywords: Japanese, tuna onigiri, rice balls, quick snack, easy recipe, Japanese mayo, seaweed wrap, portable meal